 Pin It
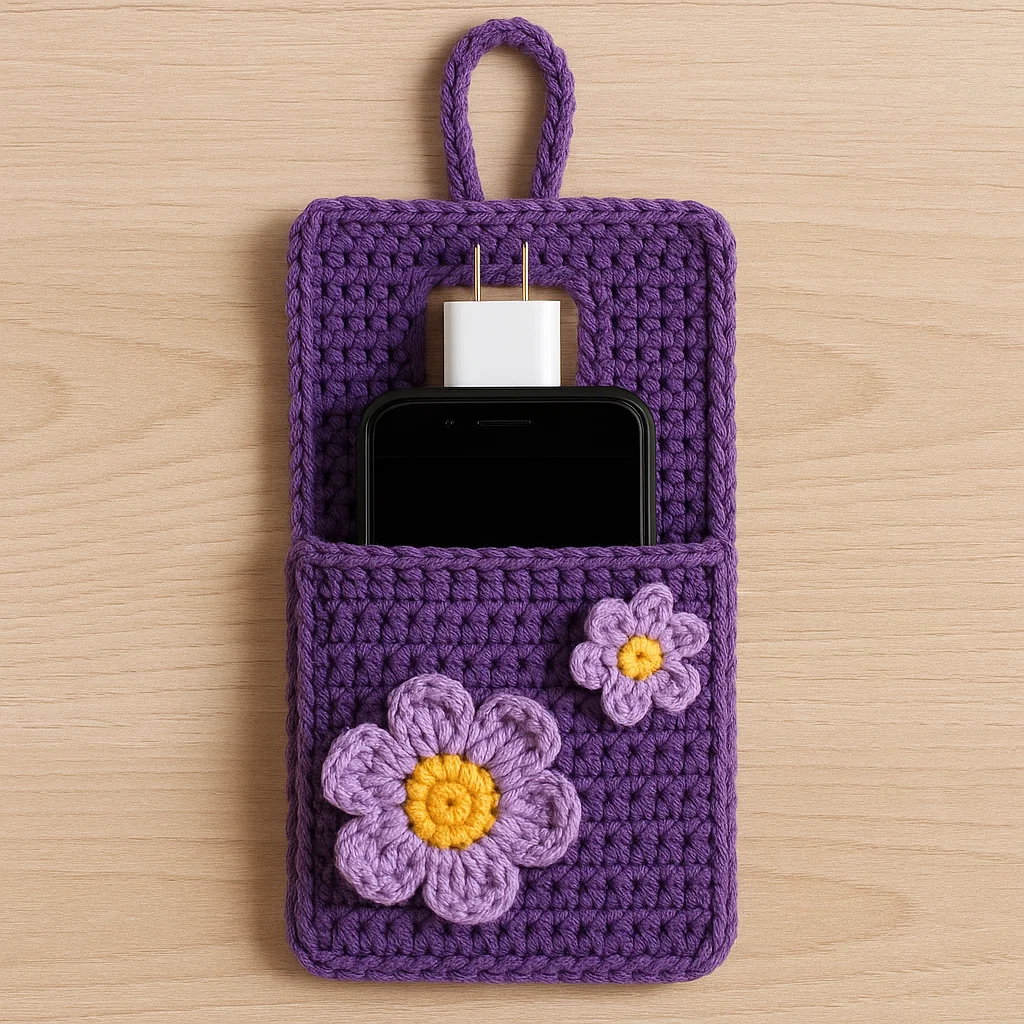
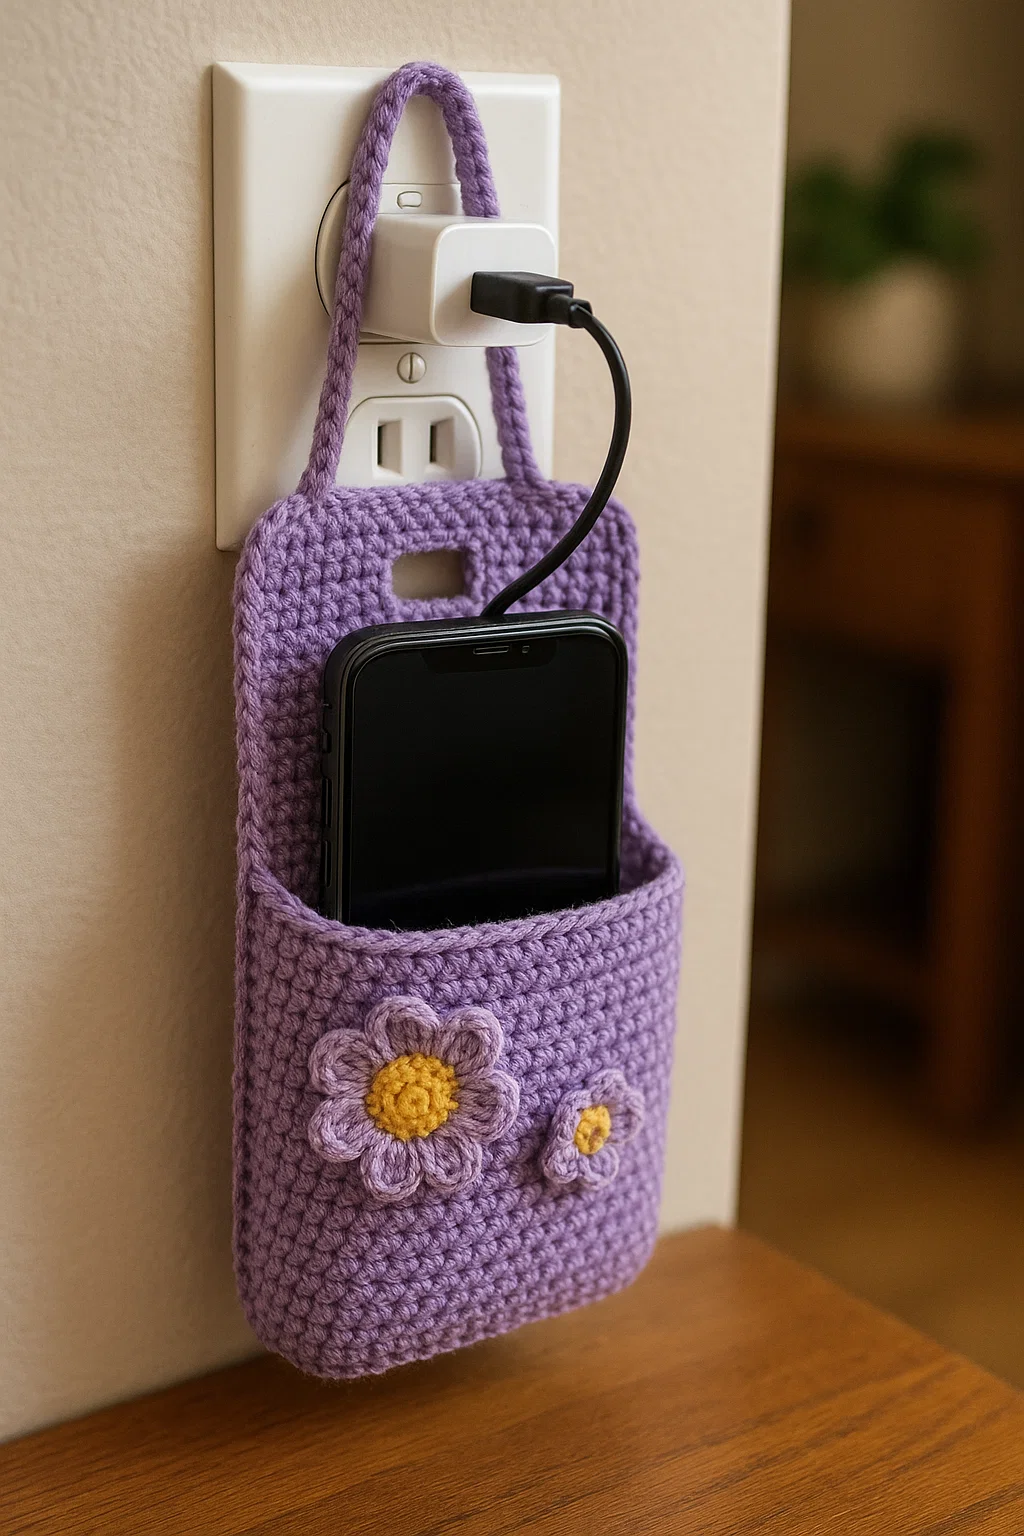
Eliminate cord tangles and lost phones forever with this ingenious crochet mobile phone charging station that combines smart design with handmade charm. This intermediate project teaches essential construction techniques for creating functional tech accessories while addressing the universal challenge of keeping devices organized and charged safely. The hanging design maximizes counter space while providing secure storage that accommodates various phone sizes and charging configurations seamlessly.
Working through this comprehensive pattern builds valuable skills in dimensional construction, precision cutting techniques, and decorative integration that elevate your crochet capabilities beyond basic accessories. Each component introduces specific challenges including creating functional openings, managing structural stability, and incorporating reinforcement elements that ensure long-term durability under daily use. The modular approach allows extensive customization while maintaining the professional appearance essential for modern home integration.
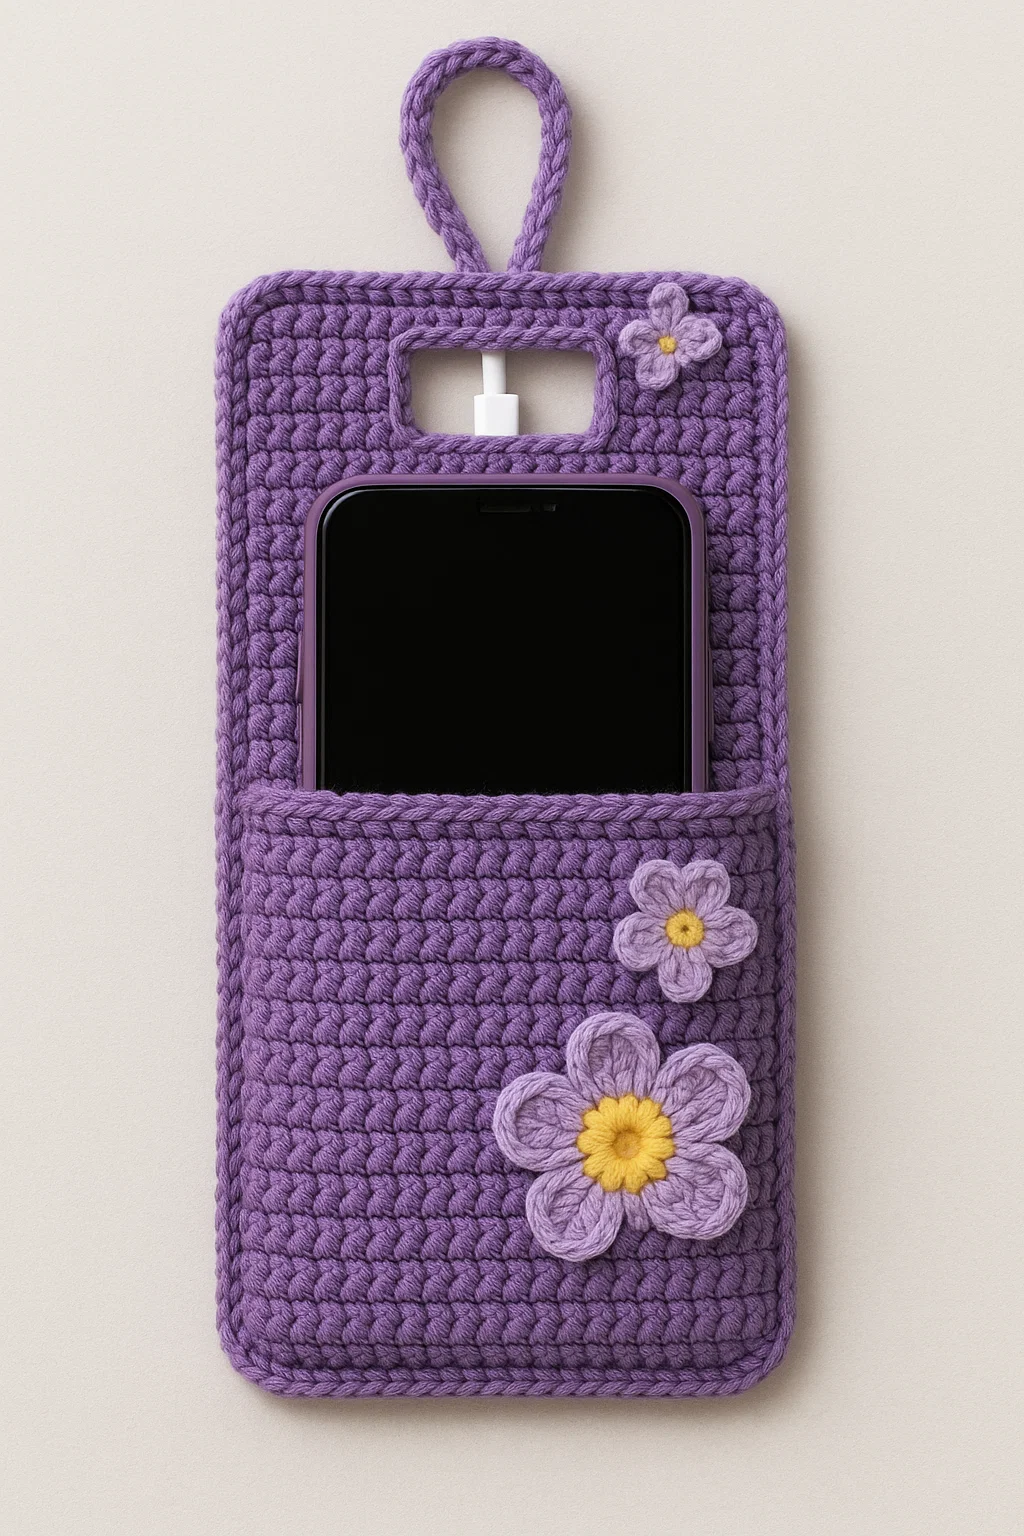
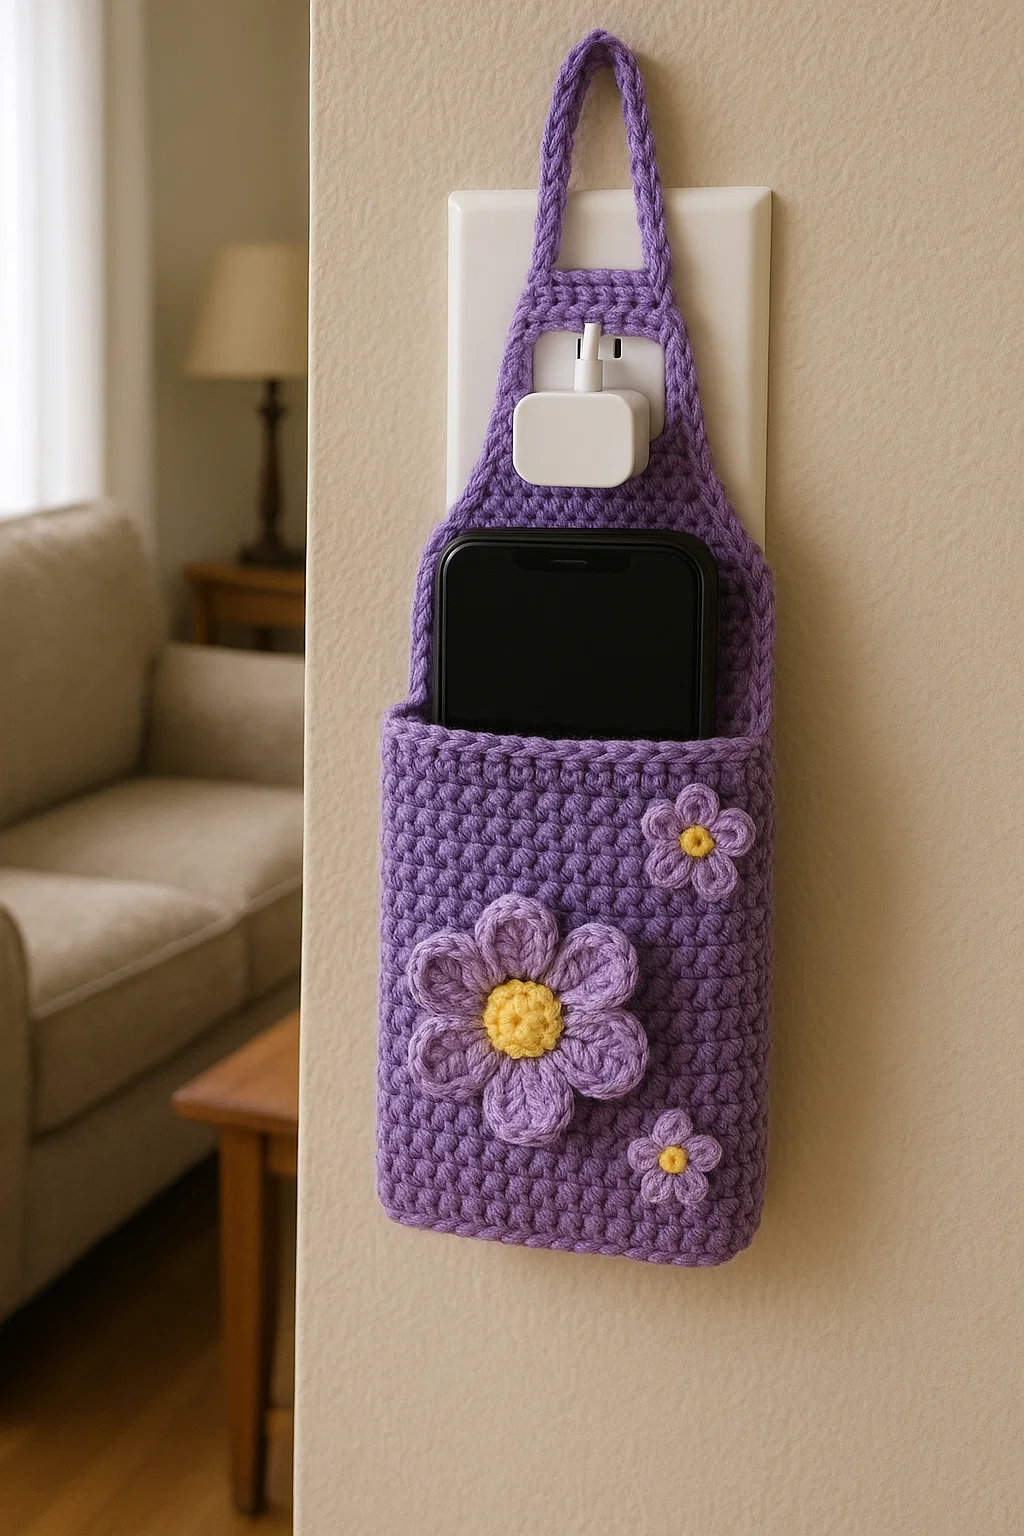
This charging station represents the perfect fusion of traditional craft techniques with contemporary lifestyle needs, demonstrating how thoughtful crochet can solve modern problems while adding aesthetic value to living spaces. The secure pocket design protects devices from drops while the strategically placed outlet opening enables charging without removing the phone from its holder. Whether organizing your own tech setup or creating thoughtful gifts for device-dependent friends and family, this project delivers both immediate utility and lasting satisfaction.
I've taught this pattern to dozens of students who initially worried about creating the outlet opening, but their confidence soars when they see how simple techniques create such professional, functional results. The satisfaction of hanging their finished charging station and watching it work perfectly with their daily routine creates enthusiasm for tackling more complex functional crochet projects. Many return to show me entire tech organization systems they've created using variations of these fundamental construction principles.
 Pin It
Materials & Tools You'll Need
- Yarn: Medium weight (4) cotton or cotton blend in coordinated colors - Requires approximately 185 yards total with 150 yards main color, 25 yards light accent, and 10 yards bright accent. Cotton provides excellent structure and shape retention essential for functional items while offering easy care and professional appearance. The three-color scheme creates visual interest without overwhelming the clean, modern aesthetic.
- Crochet Hook: Size G/7 (4.5mm) or H/8 (5.0mm) - The G hook creates optimal tension for most intermediate crocheters, producing firm fabric that maintains structure while remaining flexible enough for easy assembly. The H hook accommodates those who crochet tightly or prefer slightly more relaxed fabric tension.
- Sharp Fabric Scissors: Essential for precision cutting - Creating clean outlet openings requires scissors capable of cutting through crochet fabric without fraying or distorting surrounding stitches. Quality scissors prevent the ragged edges that compromise both function and appearance.
- Tapestry Needle: Large eye for assembly and finishing - Essential for invisible seaming and secure component attachment. Choose a sharp point for precise stitching through multiple fabric layers during reinforcement phases.
- Stitch Markers: For tracking construction progress - Particularly helpful when working multiple similar panels and marking placement positions for openings and decorative elements throughout the construction process.
- Fabric Stiffener or Lightweight Interfacing: For structural support - Adds stability and professional appearance while preventing sagging or distortion with regular use. Choose materials that won't deteriorate with humidity or handling over time.
- Measuring Tape: For accurate sizing and placement - Essential for ensuring components fit together properly and accommodate your specific device and outlet configuration before beginning construction work.
- Pins: For temporary positioning during assembly - Enables precise component placement and fit testing before permanent attachment, preventing alignment errors that compromise both function and appearance.
Step-by-Step Instructions
- Construct the Foundation Main Panel:
- Begin with the back panel that provides structural foundation for the entire charging station. Work in rows to create uniform fabric density while maintaining consistent tension throughout. This panel must support the weight of your device while hanging, making careful attention to stitch consistency essential for long-term durability and professional appearance.
- Execute Precision Outlet Opening Construction:
- The outlet opening requires careful planning and precise execution to ensure proper fit and clean appearance. Measure your specific outlet and charger configuration before marking the opening location. Cut carefully with sharp scissors, then immediately reinforce the edges with multiple rounds of single crochet to prevent fraying and create smooth, professional-looking openings.
- Build the Secure Phone Pocket Component:
- The front pocket panel must be sized appropriately for your device while maintaining proportional balance with the overall design. Work this panel with identical tension to the main panel to ensure seamless assembly and consistent appearance. The pocket depth determines device security, making accurate measurement and construction essential for optimal functionality.
- Create Structural Side Panel Elements:
- The two side panels provide crucial dimensional stability that transforms flat panels into a functional three-dimensional pocket. These panels determine the overall pocket depth and must be constructed with consistent tension to ensure uniform assembly and proper device fit during daily use.
- Master Professional Assembly Techniques:
- Proper component integration requires strategic sequencing to prevent inaccessible areas during construction. Begin with attaching the pocket to the main panel, establishing basic structure before adding side panels that create the dimensional pocket space. Work systematically to maintain consistent seam appearance and structural integrity throughout assembly.
- Integrate Reinforcement Elements Strategically:
- Internal structure support distinguishes professional-quality functional items from amateur attempts that lose shape with regular use. Install interfacing or stiffening materials during assembly for cleanest results, positioning supports to enhance stability without interfering with device insertion or removal.
- Add Functional and Decorative Finishing Elements:
- The hanging mechanism must support the weight of the entire station plus device securely while complementing the overall aesthetic. Decorative flowers provide visual interest while demonstrating how functional items can incorporate beautiful design elements without compromising utility or professional appearance.
 Pin It
I consistently recommend cotton yarn for tech accessories because it provides excellent structure while remaining flexible enough for easy device access. My own charging station has been organizing my bedside setup for two years, maintaining perfect shape while the purple color scheme coordinates beautifully with my room décor. The flower embellishments have sparked countless conversations about how functional items can be genuinely beautiful while solving real everyday problems.
Troubleshooting Technical Construction Challenges
Outlet opening creation can intimidate even experienced crocheters, but proper technique eliminates most common problems. Mark the opening area clearly with stitch markers before cutting, and always cut smaller than needed initially - you can always enlarge openings, but you cannot make them smaller without extensive reconstruction work. Immediately reinforce cut edges with multiple rounds of single crochet to prevent fraying.
Device fit issues usually stem from inadequate measurement or failure to account for protective cases and charging cables. Always test fit your actual device configuration during construction rather than waiting until completion to discover sizing problems. The pocket should accommodate your device comfortably without excessive tightness that makes insertion difficult or looseness that compromises security.
Hanging stability requires attention to weight distribution and attachment point strength. The hanging mechanism must support not just the weight of the station but also the device and any cable weight that could create uneven loading. Test your hanging method with the actual device weight before finalizing attachment points to ensure secure, stable operation.
Advanced Customization and Adaptation Techniques
This basic construction method adapts beautifully to various device sizes and charging configurations beyond standard smartphones. Tablet versions require proportional scaling of all components while maintaining the same construction principles and assembly sequence. Consider different orientation options - horizontal placement might work better for some devices or outlet configurations.
Multi-device stations expand the concept by incorporating multiple pockets or compartments for different devices or accessories. These variations require careful planning to maintain structural balance while accommodating various device weights and sizes. The modular construction approach established in this pattern enables confident expansion to more complex organizational systems.
Professional Finishing and Presentation Techniques
The difference between obviously handmade and professionally crafted tech accessories often lies in finishing details and attention to functional requirements. Steam blocking helps settle stitches and enhance the crisp appearance essential for modern home integration. Pay particular attention to edge treatments and seam consistency that contribute to the overall professional appearance.
Color coordination significantly affects how well your finished piece integrates with existing décor and technology. Consider your room's color scheme and the colors of your actual devices when selecting yarn colors. Neutral color schemes ensure longevity and broad appeal, while accent colors can coordinate with seasonal decorations or personal style preferences.
Safety Considerations and Best Practices
Electrical safety requires attention to outlet compatibility and proper clearance around charging elements. Ensure your outlet opening accommodates your specific charger without creating tight fits that could stress charging cables or create heat buildup. Never force oversized chargers through openings that aren't adequately sized for safe operation.
Weight distribution affects both safety and functionality over time. The hanging mechanism must distribute device weight evenly to prevent stress concentration that could cause failure. Consider the combined weight of your device, any protective case, and charging cables when designing and testing your hanging system for long-term reliability.
Building Your Functional Crochet Skills
This charging station serves as an excellent introduction to creating functional crochet items that solve real problems while maintaining aesthetic appeal. The techniques learned here apply directly to countless other tech organization projects including cord management systems, device storage solutions, and custom organizers for specific electronic accessories.
Document your construction process and any modifications you discover during assembly. These notes become invaluable references for future functional projects requiring similar techniques or adaptations. Understanding how dimensional construction creates functional items enables confident modification of existing patterns or creation of original designs for specific organizational needs.
Creating Coordinated Tech Organization Systems
Master this basic construction method, and you've unlocked the ability to create comprehensive tech organization solutions throughout your home. Bedside versions might include additional pockets for glasses or books, while office adaptations could incorporate pen holders or business card storage. Kitchen versions work beautifully for recipe viewing while keeping devices charged and accessible.
Experiment with different hanging mechanisms and mounting options to accommodate various room layouts and furniture configurations. Some applications benefit from hook hanging, while others work better with adhesive mounting or integration with existing furniture. The modular approach established in this pattern adapts to virtually any mounting situation with appropriate planning.
 Pin It
Complete Mobile Phone Charging Station Pattern
Skill Level: Beginner to Intermediate
Finished Size: 8-9" long x 4-5" wide x 2-3" deep
Yarn Weight: Medium Weight (4)
Estimated Time: 4-6 hours
Materials List:
Main Color (Purple): 150 yards medium weight yarn
Light Accent (Lavender): 25 yards
Bright Accent (Yellow/Gold): 10 yards
Hook: 4.5mm (G/7) or 5mm (H/8)
Notions: Yarn needle, stitch markers, fabric stiffener, scissors, measuring tape
Pattern Abbreviations:
ch = chain
sc = single crochet
hdc = half double crochet
dc = double crochet
sl st = slip stitch
inc = increase
dec = decrease
st(s) = stitch(es)
rnd = round
BLO = back loops only
MAIN BODY PANEL
Foundation: Ch 21
Row 1: Sc in 2nd ch from hook, sc across (20 sc)
Rows 2-40: Ch 1, turn, sc across (20 sc)
This creates the main back panel
CHARGER OUTLET OPENING
Locate position: Approximately rows 8-12 from top, centered
Create opening:
• Mark area: 3 stitches wide x 3 rows high
• Cut carefully: Use scissors to cut opening
• Reinforce edges: Join yarn at corner of opening, Sc around entire opening perimeter, Work 2-3 rounds to strengthen edges
PHONE POCKET
Foundation: Ch 21 (same width as main panel)
Row 1: Sc in 2nd ch from hook, sc across (20 sc)
Rows 2-18: Ch 1, turn, sc across (20 sc)
This creates the front pocket panel
SIDE PANELS (Make 2)
Foundation: Ch 8
Row 1: Sc in 2nd ch from hook, sc across (7 sc)
Rows 2-18: Ch 1, turn, sc across (7 sc)
These create the pocket depth
ASSEMBLY INSTRUCTIONS
Step 1: Attach Pocket to Main Panel
• Position pocket: Place pocket panel on front of main panel, leaving top 5-6 rows open
• Pin in place: Bottom and sides align
• Sew bottom edge: Whipstitch pocket bottom to main panel
• Leave sides open for now
Step 2: Add Side Panels
• Attach first side: Sew one long edge of side panel to side edge of pocket
• Continue seam: Sew same side panel to main panel side
• Repeat: Attach second side panel to other side
• Check fit: Ensure phone will fit comfortably in pocket
Step 3: Finish Pocket Opening
• Top edge: Sc around top opening of pocket
• Reinforce: Work 2 rounds for stability
• Shape opening: Ensure it's wide enough for phone insertion
HANGING LOOP
Method 1: Simple Loop
Foundation: Ch 20
Row 1: Sc in 2nd ch from hook, sc across (19 sc)
Rows 2-3: Ch 1, turn, sc across
Form into loop and sew ends to top back of case
Method 2: Braided Strap
• Cut 6 strands of yarn, each 24 inches long
• Braid together, leaving 2 inches on each end
• Sew securely to top corners of case
DECORATIVE FLOWERS
Large Flower (Make 1)
Center (Yellow):
Rnd 1: Magic ring, 6 sc (6)
Rnd 2: Inc in each st around (12)
Fasten off
Petals (Light Purple):
Rnd 1: Join to center, *ch 4, 3 dc in ring, ch 4, sl st; rep from * 6 times (6 petals)
Rnd 2: Working behind petals, *ch 6, sl st between petals; rep from * around
Rnd 3: In each ch-6 space: *sl st, ch 1, 6 dc, ch 1, sl st; rep from *
Fasten off
Small Flower (Make 1)
Center (Yellow):
Rnd 1: Magic ring, 6 sc (6)
Fasten off
Petals (Light Purple):
Rnd 1: Join to center, *ch 3, 2 dc in ring, ch 3, sl st; rep from * 5 times (5 petals)
Fasten off
REINFORCEMENT OPTIONS
Option 1: Fabric Stiffener
• Cut interfacing: Same size as main panels
• Insert: Place between main panel and pocket before final assembly
• Secure: Tack in place with hidden stitches
Option 2: Plastic Canvas
• Cut to size: Slightly smaller than panels
• Round edges: Prevent sharp corners
• Insert: Place in pocket before closing seams
FINISHING INSTRUCTIONS
Step 1: Border
Rnd 1: Join yarn at any corner, sc evenly around entire case perimeter
Rnd 2: *Sc 2, hdc 1, sc 2; rep from * for decorative edge
Step 2: Attach Flowers
• Position large flower: Lower portion of case front
• Position small flower: Upper portion or on hanging loop
• Sew securely: Use yarn needle and matching thread
Step 3: Final Touches
• Check all seams: Reinforce any weak spots
• Test fit: Ensure charger and phone fit properly
• Steam block: Lightly steam to set shape
CUSTOMIZATION OPTIONS
Size Adjustments
For larger phones:
• Add 2-4 stitches to width
• Add 2-4 rows to length
For smaller phones:
• Reduce width by 2-4 stitches
• Reduce length by 2-4 rows
Color Variations
• Neutral: Beige, cream, gray
• Bold: Bright blue, emerald green, coral
• Monochrome: All white with silver accents
• Seasonal: Match your home décor
Additional Features
Cord management:
• Add small loops on sides for cord organization
• Create channel along back for cord routing
Extra storage:
• Add small pocket for earbuds
• Create sleeve for charging cable
CARE INSTRUCTIONS
- Hand wash: Cool water with mild detergent
- Dry flat: Maintain shape while drying
- Avoid: High heat, harsh chemicals
- Storage: Hang in dry location when not in use
SAFETY NOTES
- Outlet compatibility: Measure your outlet before starting
- Weight limit: Don't overload with heavy devices
- Cord safety: Ensure cords aren't pinched or bent sharply
- Regular inspection: Check for wear and tear
TROUBLESHOOTING
Case doesn't hang straight:
• Check hanging loop attachment
• Ensure equal weight distribution
• Add small weight to bottom if needed
Phone doesn't fit:
• Measure phone with case if applicable
• Adjust pocket dimensions before final assembly
• Consider orientation (vertical vs horizontal)
Charger opening too small:
• Carefully enlarge with scissors
• Re-crochet border around opening
• Test fit before finishing
PATTERN VARIATIONS
Tablet Version
• Increase all dimensions by 50%
• Use bulkier yarn for faster work
• Add extra reinforcement
Multi-Device Station
• Create multiple pockets
• Add dividers between sections
• Include cord management system
This mobile phone charging station represents the perfect blend of traditional crochet techniques with modern lifestyle solutions, demonstrating how handmade items can solve contemporary problems while adding beauty to living spaces. The combination of functional design, attractive aesthetics, and practical construction techniques creates a project that rewards both the making process and years of daily use. Take time to customize this pattern for your specific devices and space - these adaptations will teach you valuable skills while creating solutions perfectly tailored to your needs.
Frequently Asked Questions
- → What type of yarn works best for a charging station?
- Cotton yarn is essential for this project because it's sturdy, maintains its shape under weight, and won't stretch out over time. Choose worsted weight (4) cotton in colors that complement your space. Avoid acrylic or wool as they don't provide the necessary structure for holding devices securely.
- → How do I create the cord management channels?
- The cord channels are created by working partial rows and strategic decreases to form tunnels. The pattern includes step-by-step instructions for creating openings at the back for cord entry and guided channels that direct cables to each device slot. You'll work around these openings to reinforce the edges and prevent stretching.
- → Can this station accommodate different phone sizes?
- Yes! The pattern includes adjustable slot widths that work with most smartphones, from compact models to large phones with cases. The base version fits standard phones, while the XL version accommodates tablets. You can also customize slot spacing based on your specific devices.
- → How do I make the base weighted and stable?
- Stability comes from tight stitching and optional weighting. The pattern uses a smaller hook size for dense fabric, and you can add weight by inserting a flat metal plate or ceramic tile in the base before finishing. Some crocheters use rice or plastic pellets in a sealed plastic bag for adjustable weight.
- → Is this suitable for beginners?
- This is a confident beginner to intermediate project. You need to know single crochet, half double crochet, and basic shaping techniques. The cord channel construction requires following detailed instructions, but the pattern includes plenty of photos showing each step. If you've made structured items like baskets, you're ready for this project.
- → How do I clean the charging station?
- Cotton construction makes cleaning easy. For light cleaning, use a lint roller or vacuum with upholstery attachment. For deeper cleaning, spot clean with mild detergent and water, then air dry completely. The removable weight insert (if used) makes thorough cleaning even easier. Avoid soaking as it may affect the shape.