 Pin It
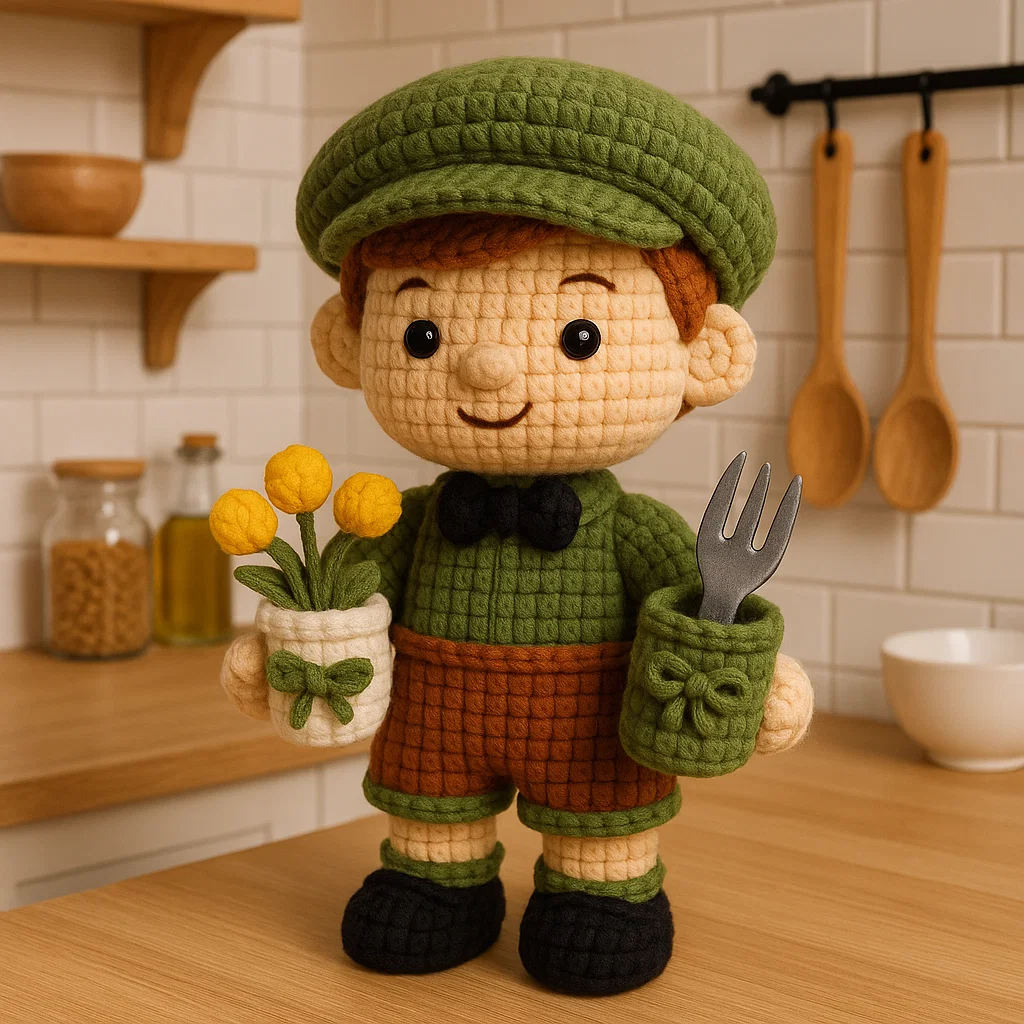
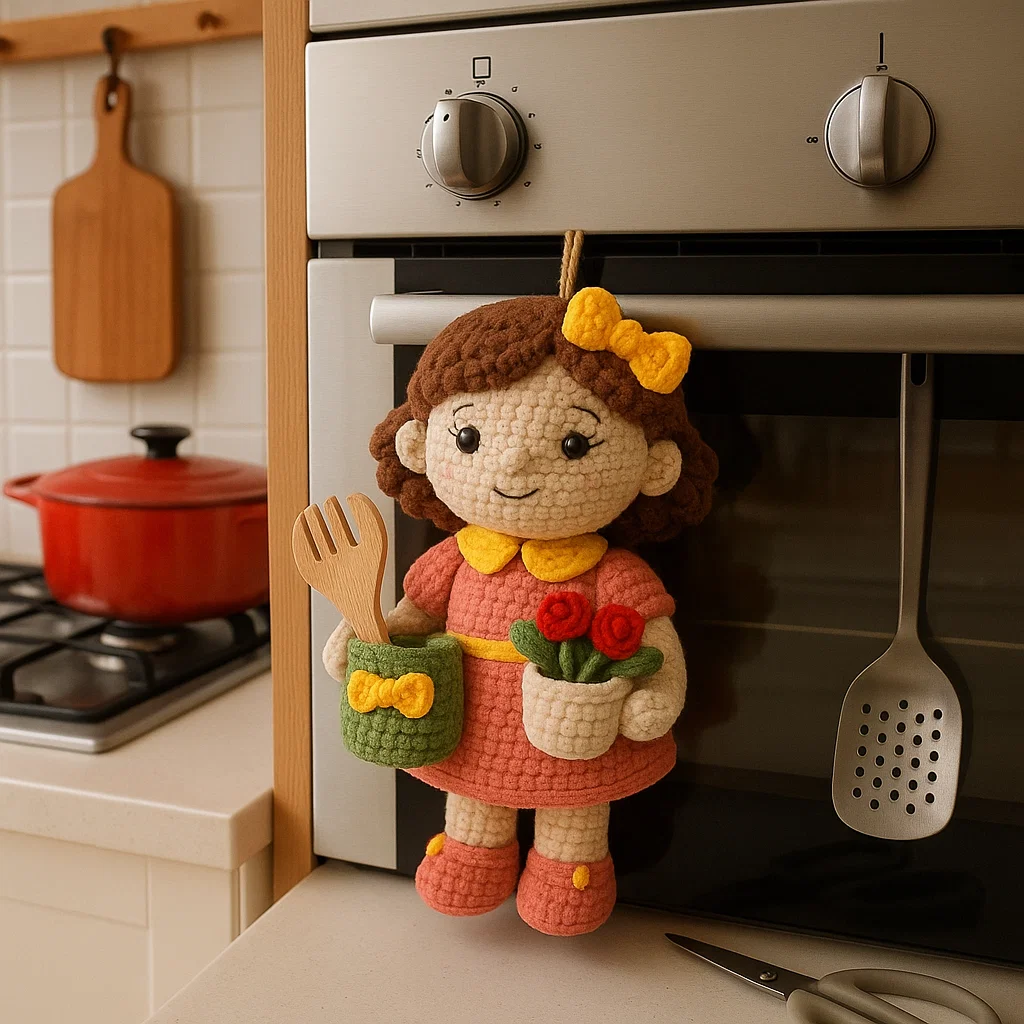
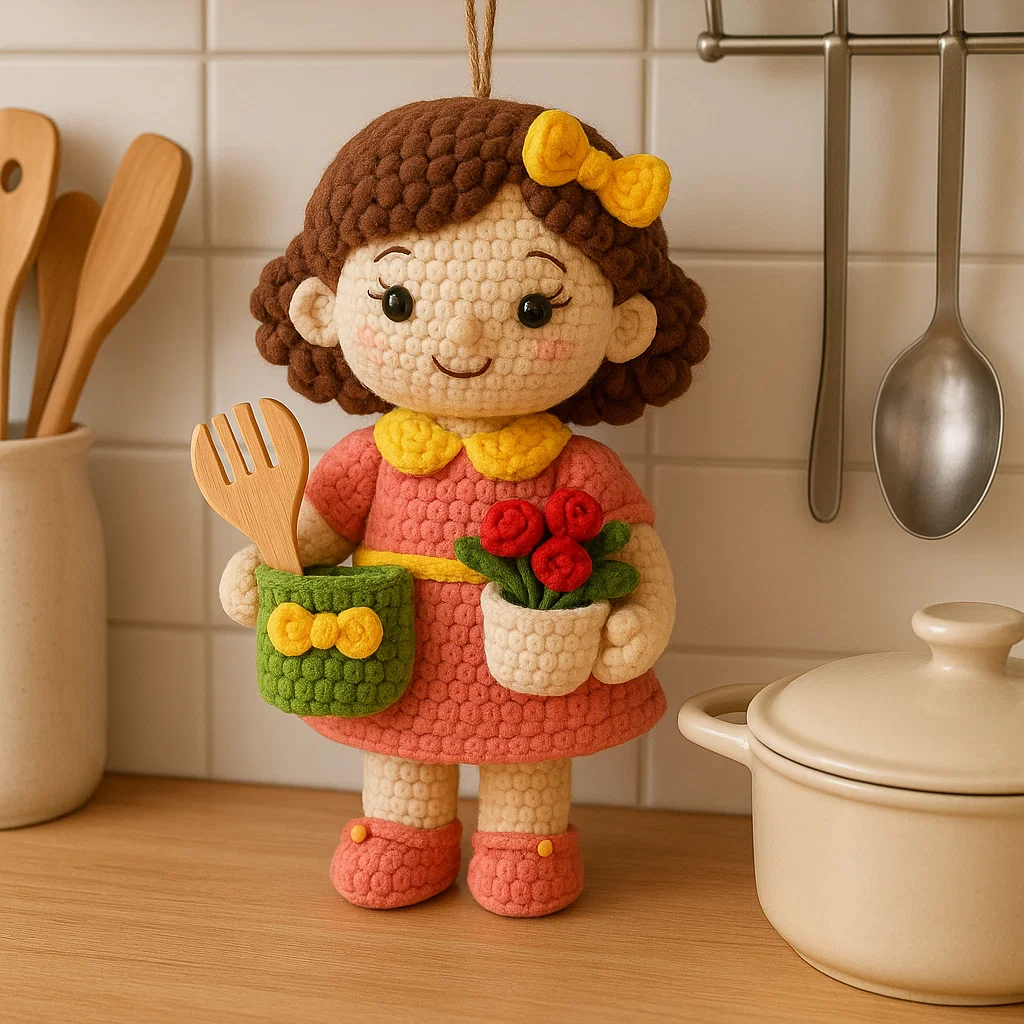
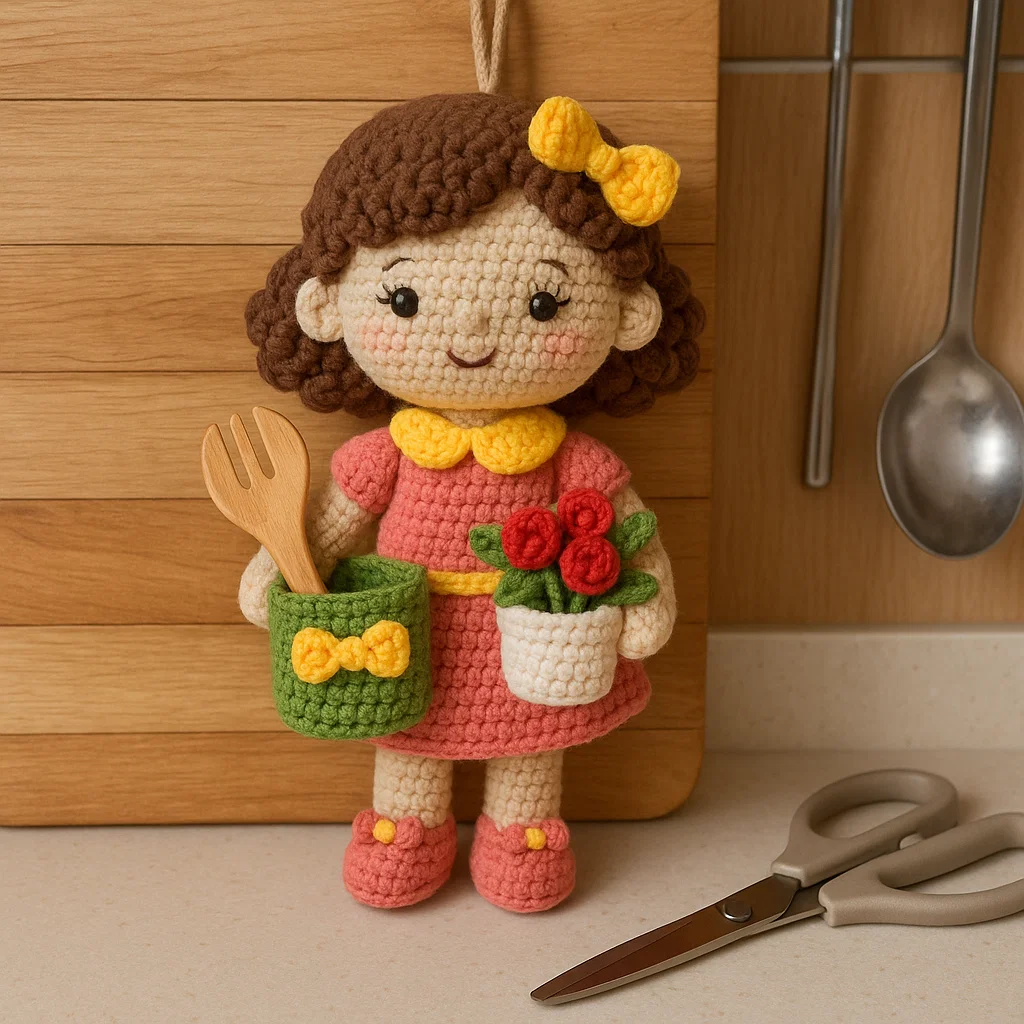
Transform your kitchen into a charming, organized space with this delightful crochet kitchen helper doll that combines decorative appeal with practical storage functionality. This comprehensive amigurumi pattern teaches essential doll-making techniques while creating a useful utensil holder that brings personality to any cooking space. The sweet kitchen maiden holds a removable flower pot in one hand while sporting a coordinating utensil holder that keeps your most-used cooking tools within easy reach.
Working through this intermediate-level project builds crucial amigurumi skills including proper shaping, dimensional construction, and professional finishing techniques that translate to countless future doll projects. The pattern incorporates multiple construction methods from basic sphere shaping for the head and body to more complex elements like textured hair, dimensional flowers, and structured containers. Each component teaches specific techniques while contributing to an cohesive, functional finished piece.
The modular design allows for extensive customization in colors, facial features, and accessories, making each kitchen helper uniquely yours. Whether you're looking to organize your own cooking space or create a thoughtful housewarming gift, this project delivers both immediate satisfaction and long-term utility. The combination of beginner-friendly basic shapes with intermediate details creates an ideal skill-building project that challenges without overwhelming.
I've guided numerous students through this pattern over the years, and it consistently becomes their gateway project into more complex amigurumi work. The moment they successfully attach the tiny flower pot and see their kitchen helper taking shape, the intimidation around dimensional crochet melts away. Many students return months later with photos of entire amigurumi families they've created using techniques mastered in this single pattern.
Materials & Tools You'll Need
- Yarn: Worsted weight acrylic or cotton blend in multiple colors - Requires approximately 300-400 yards total across all colors. Choose skin-tone beige, rich brown for hair, cheerful pink for dress and shoes, bright yellow for accents, classic red for flowers, fresh green for leaves, and crisp white for the flower pot. Acrylic provides durability for frequently handled pieces, while cotton offers better stitch definition for detailed work.
- Crochet Hook: Size E/4 (3.5mm) or G/6 (4.0mm) - Smaller hooks create tighter fabric essential for amigurumi structure, preventing stuffing from showing through stitches. The E hook works best with worsted weight yarn for firm, professional results, while the G hook accommodates looser tension crocheters.
- Polyester Fiberfill Stuffing: High-quality, non-clumping variety - Choose stuffing that maintains its loft over time, as this piece will likely see regular handling. Avoid cheap stuffing that creates lumpy, uneven shapes or compresses permanently with use.
- Yarn Needle: Large eye tapestry needle for assembly - Essential for invisible seaming and secure attachment of all components. A bent-tip needle can make navigating tight spaces easier during assembly phases.
- Black Embroidery Thread: For facial features - Provides crisp, defined eyes and mouth details that won't fade or blur over time. Choose six-strand floss that can be separated for different line weights.
- Stitch Markers: For tracking round beginnings - Particularly helpful when working multiple similar pieces like arms and legs, preventing confusion about round counts and shaping placement.
- Sharp Fabric Scissors: For clean yarn cuts - Clean cuts prevent fraying and make finishing work much more professional, especially important when working with multiple color changes.
Step-by-Step Instructions
- Begin with the Head Foundation:
- Create a magic ring and work the basic sphere shape that forms the foundation for all amigurumi heads. Start with 6 single crochet stitches in the ring, then follow the standard increase pattern through Round 6 to achieve 36 stitches. The key to a perfectly round head lies in maintaining consistent tension throughout the increase rounds - too tight creates a cone shape, while too loose creates ruffling that cannot be corrected later.
- Shape the Head Properly:
- Work 7 even rounds without increases to create the cylindrical middle section that gives your doll proper proportions. This section determines the final head size and should measure approximately 3 inches in diameter when properly executed. Begin decreasing in Round 14, following the reverse of your increase pattern to create a smooth, rounded closure that accepts stuffing without creating peaks or indentations.
- Construct the Body with Proper Proportions:
- The body follows similar construction principles but with different proportional scaling to create the dress silhouette. Work through Round 5 to establish the 30-stitch base, then maintain that width through Round 12 to create the bodice length. The slight decreasing in Rounds 13-17 creates the natural waist taper that gives your doll realistic proportions rather than a cylindrical appearance.
- Master Limb Construction Techniques:
- Arms and legs require careful attention to stuffing distribution and shaping. Work the arms from fingertip to shoulder, creating the slight taper that mimics natural limb proportions. Stuff lightly to maintain flexibility while preventing collapse - overstuffed limbs become rigid and difficult to position naturally, while understuffed limbs cannot maintain their shape during handling.
- Create Dimensional Hair Texture:
- The hair base follows head construction principles but requires additional texture work to create realistic appearance. After completing the basic cap shape, add dimensional elements through loop stitches, bobble stitches, or surface crochet techniques that create the illusion of individual hair strands. The texture technique you choose dramatically affects the final personality of your doll.
- Construct Functional Accessories:
- The flower pot and utensil holder require special attention to structural integrity since they serve functional purposes. Work these pieces with slightly tighter tension than decorative elements, and consider adding internal structure like cardboard circles in the bases for additional stability. The removable flower pot should fit securely in the doll's arms without requiring permanent attachment.
- Execute Professional Assembly:
- Proper assembly transforms individual components into a cohesive, professional-looking finished piece. Position the head slightly forward on the body rather than perfectly centered to create natural posture. Attach arms at slight downward angles rather than straight out for realistic positioning. Legs should angle slightly apart for stable standing, and all seams should be invisible from the front view.
 Pin It
I consistently choose worsted weight acrylic for functional amigurumi pieces because it withstands frequent handling while maintaining shape integrity over years of use. My own kitchen helper has been reorganizing my utensil drawer for three years, and the colors remain vibrant while the structure stays firm. The removable flower pot feature has proven especially popular with gift recipients who love being able to change seasonal flowers or use it as a tiny succulent planter.
Troubleshooting Common Amigurumi Problems
Maintaining consistent stitch size throughout multi-colored projects challenges even experienced crocheters. Different yarn colors often have slightly different textures or tensions, requiring minor hook size adjustments to maintain uniform fabric density. Test each new color with a few practice stitches before incorporating it into your project, and don't hesitate to switch hook sizes if necessary to maintain consistency.
Stuffing distribution affects both appearance and durability. Fill head and body pieces firmly but avoid creating hard, unyielding surfaces that feel unnatural to touch. Limbs require lighter stuffing to maintain flexibility, while functional elements like the utensil holder need enough structure to maintain their shape under weight. Pack stuffing gradually in small amounts rather than trying to fill large cavities all at once.
Advanced Assembly and Finishing Techniques
Professional amigurumi assembly requires planning the attachment order to avoid creating inaccessible areas during construction. Attach the head to body first, establishing the basic silhouette before adding limbs. Position arms and legs while the body remains accessible, then add hair, clothing details, and accessories in final finishing phases. This sequence prevents situations where you cannot reach areas that need work.
Invisible seaming techniques separate amateur from professional amigurumi work. Use the yarn tails from each piece to create seamless attachments that appear grown rather than sewn together. Work through the back loops of stitches along seam lines, pulling firmly to create tight, invisible connections that will withstand years of handling without loosening or showing gaps.
Customization and Personal Expression
This pattern provides an excellent foundation for personal creativity and adaptation. Change hair colors and styles to match family members, or create seasonal variations with different dress colors and flower arrangements. The modular design allows you to experiment with different facial expressions, from sweet smiles to concentrated cooking expressions, simply by adjusting embroidery placement and style.
Consider creating themed variations for different holidays or occasions. Spring versions might feature pastel colors with tiny tulips, while autumn helpers could sport warm orange dresses with miniature pumpkins. Winter variations in white and silver create elegant holiday displays, and summer versions in bright primary colors bring cheerful energy to any kitchen space.
Skill Building Through Complex Construction
This project introduces numerous advanced amigurumi concepts that apply to countless future projects. The combination of basic shapes creates understanding of how complex forms emerge from simple geometric foundations. Working with multiple colors simultaneously teaches efficient yarn management and color change techniques essential for realistic amigurumi construction.
The dimensional flower and leaf construction introduces surface embellishment techniques that enhance many other amigurumi projects. Understanding how flat elements attach to curved surfaces opens possibilities for adding clothing details, facial features, and decorative elements to any doll or animal pattern. These skills compound quickly, enabling increasingly sophisticated project attempts.
 Pin It
Yarn Selection and Color Theory
Color choice dramatically affects the final personality and appeal of your kitchen helper doll. Traditional combinations create timeless appeal that complements most kitchen décor, while bold, modern color schemes make striking contemporary statements. Consider your kitchen's existing color palette when selecting yarns, or choose neutrals that coordinate with seasonal decoration changes.
Fiber content affects both appearance and durability for functional amigurumi pieces. Cotton provides excellent stitch definition and withstands frequent washing, making it ideal for kitchen environments where cleanliness matters. Acrylic offers superior color retention and shape memory, important for pieces that will be handled regularly. Cotton-acrylic blends combine the best properties of both fibers for optimal performance.
Professional Display and Care
Proper finishing transforms your kitchen helper from obviously handmade to professionally crafted. Steam blocking helps settle stitches and enhance shape definition, particularly important for the structured elements like the utensil holder and flower pot. Pin pieces to proper shapes while damp, allowing them to dry completely before removing blocking materials.
Consider the final display environment when planning finishing details. Kitchen helpers exposed to cooking moisture need extra attention to seam security and color fastness. Those intended primarily for decoration can incorporate more delicate details like beaded accents or metallic threads that might not withstand daily use but add visual interest.
Creative Project Variations
Master this basic construction method, and you've unlocked the ability to create endless character variations for different rooms and purposes. Bedroom helpers might hold jewelry or hair accessories, while office versions could organize desk supplies or hold business cards. Garden-themed helpers work beautifully for organizing seed packets or small tools, while holiday variations create seasonal focal points throughout the home.
Experiment with scale variations to create families of helpers for different purposes. Smaller versions make perfect gift toppers or stocking stuffers, while larger versions can handle more substantial storage needs. The proportional relationships established in this pattern scale successfully in either direction with appropriate yarn and hook size adjustments.
Building Your Amigurumi Expertise
This kitchen helper pattern serves as an excellent stepping stone toward more complex amigurumi projects like realistic dolls, detailed animals, or fantasy creatures. The combination of basic shapes, dimensional elements, and functional construction teaches principles that apply across all advanced amigurumi work. Document your construction process and any modifications you discover - these notes become invaluable references for future projects.
Use this project to experiment with different finishing techniques and personal style preferences. Try various hair texturing methods, facial expression options, and accessory placements to discover your preferred approaches. These experiments help develop the personal artistic voice that distinguishes your work from pattern reproductions and moves you toward original design capabilities.
Complete Kitchen Helper Doll Pattern
Skill Level: Intermediate
Finished Size: Approximately 8-10 inches tall
Yarn Weight: Worsted Weight (4)
Materials List:
Beige/Cream: 100 yards (skin tone)
Brown: 50 yards (hair)
Yellow/Gold: 75 yards (bow, collar, accents)
Pink/Coral: 100 yards (dress, shoes)
Red: 25 yards (flowers)
Green: 50 yards (leaves, utensil holder)
White: 40 yards (flower pot)
Hook: 3.5mm (E/4) or 4mm (G/6)
Stuffing: Polyester fiberfill
Notions: Yarn needle, stitch markers, black embroidery thread
Pattern Abbreviations:
ch = chain
sc = single crochet
inc = increase (2 sc in one stitch)
dec = decrease (sc2tog)
sl st = slip stitch
dc = double crochet
hdc = half double crochet
st(s) = stitch(es)
rnd = round
HEAD (Beige)
Rnd 1: Magic ring, 6 sc (6)
Rnd 2: Inc in each st around (12)
Rnd 3: *Sc 1, inc; rep from * around (18)
Rnd 4: *Sc 2, inc; rep from * around (24)
Rnd 5: *Sc 3, inc; rep from * around (30)
Rnd 6: *Sc 4, inc; rep from * around (36)
Rnds 7-13: Sc around (36) - 7 rounds
Rnd 14: *Sc 4, dec; rep from * around (30)
Rnd 15: *Sc 3, dec; rep from * around (24)
Rnd 16: *Sc 2, dec; rep from * around (18)
Stuff firmly
Rnd 17: *Sc 1, dec; rep from * around (12)
Rnd 18: Dec around (6)
Fasten off, close opening
BODY (Pink)
Rnd 1: Magic ring, 6 sc (6)
Rnd 2: Inc in each st around (12)
Rnd 3: *Sc 1, inc; rep from * around (18)
Rnd 4: *Sc 2, inc; rep from * around (24)
Rnd 5: *Sc 3, inc; rep from * around (30)
Rnds 6-12: Sc around (30) - 7 rounds
Rnd 13: *Sc 3, dec; rep from * around (24)
Rnds 14-15: Sc around (24)
Stuff firmly
Rnd 16: *Sc 2, dec; rep from * around (18)
Rnd 17: *Sc 1, dec; rep from * around (12)
Fasten off, leave long tail for sewing
ARMS (Beige) - Make 2
Rnd 1: Magic ring, 6 sc (6)
Rnd 2: *Sc 1, inc; rep from * around (9)
Rnds 3-4: Sc around (9)
Rnd 5: *Sc 1, dec; rep from * around (6)
Rnds 6-12: Sc around (6) - 7 rounds
Stuff lightly, fasten off
LEGS (Beige) - Make 2
Rnd 1: Magic ring, 6 sc (6)
Rnd 2: Inc in each st around (12)
Rnds 3-4: Sc around (12)
Rnd 5: *Sc 4, dec; rep from * around (10)
Rnds 6-10: Sc around (10) - 5 rounds
Stuff lightly, fasten off
SHOES (Pink) - Make 2
Rnd 1: Magic ring, 6 sc (6)
Rnd 2: Inc in each st around (12)
Rnd 3: *Sc 1, inc; rep from * around (18)
Rnd 4: Sc in back loops only (18)
Rnds 5-6: Sc around (18)
Rnd 7: Sc 6, dec 3 times, sc 6 (15)
Rnd 8: Sc 6, dec 1, sc 7 (14)
Fasten off
HAIR (Brown)
Base:
Rnd 1: Magic ring, 6 sc (6)
Rnd 2: Inc in each st around (12)
Rnd 3: *Sc 1, inc; rep from * around (18)
Rnd 4: *Sc 2, inc; rep from * around (24)
Rnd 5: *Sc 3, inc; rep from * around (30)
Rnd 6: *Sc 4, inc; rep from * around (36)
Rnds 7-10: Sc around (36) - 4 rounds
Hair Texture: Create texture by making loop stitches or bobble stitches around the hair base
YELLOW BOW - Make 2 (Hair bow and shoe bows)
Main part:
Ch 12, turn
Rows 1-4: Sc across, ch 1, turn
Fasten off
Center wrap:
Ch 6, work in rounds to create small tube
Wrap around center of bow rectangle and sew
YELLOW COLLAR
Ch 60 (adjust for neck size)
Row 1: Sc across
Row 2: *Ch 3, skip 1, sc 1; rep from * for scalloped edge
Fasten off
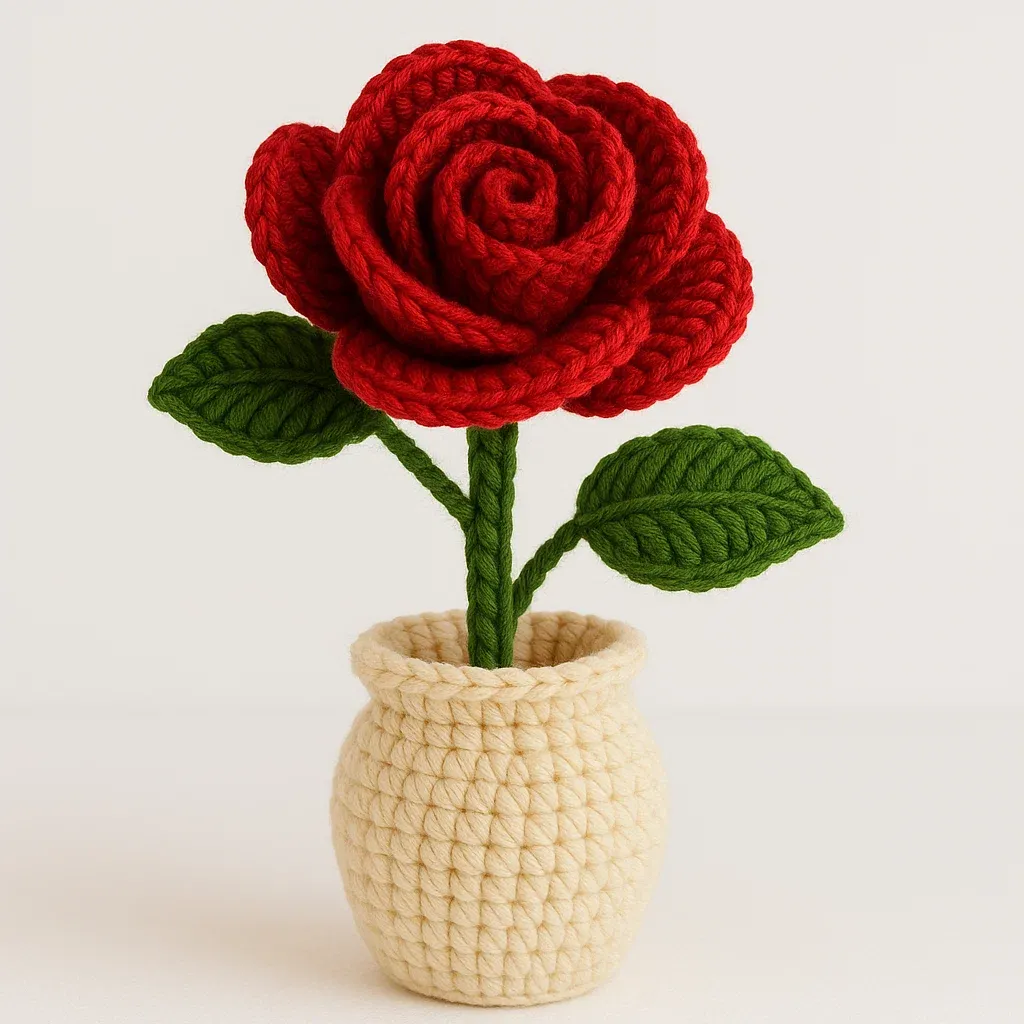
FLOWER POT (White)
Bottom:
Rnd 1: Magic ring, 6 sc (6)
Rnd 2: Inc in each st around (12)
Rnd 3: *Sc 1, inc; rep from * around (18)
Sides:
Rnd 4: Sc in back loops only (18)
Rnds 5-8: Sc around (18) - 4 rounds
Fasten off
FLOWERS (Red) - Make 3
Rnd 1: Magic ring, ch 2, 10 dc in ring, sl st to first dc
Rnd 2: *Ch 3, sc in next st; rep from * around
Fasten off
LEAVES (Green) - Make 6
Ch 6
Sc in 2nd ch from hook, hdc, dc, hdc, sc
Ch 1, working on other side: sc, hdc, dc, hdc, sc
Fasten off
UTENSIL HOLDER (Green)
Bottom:
Rnd 1: Magic ring, 6 sc (6)
Rnd 2: Inc in each st around (12)
Rnd 3: *Sc 1, inc; rep from * around (18)
Rnd 4: *Sc 2, inc; rep from * around (24)
Sides:
Rnd 5: Sc in back loops only (24)
Rnds 6-12: Sc around (24) - 7 rounds
Fasten off
Add yellow bow to front of utensil holder
ASSEMBLY INSTRUCTIONS
- Attach head to body using long tail from body
- Sew arms to sides of body at shoulder level
- Attach legs to bottom of body
- Put shoes on feet and sew in place
- Attach hair to head, positioning for desired style
- Add hair bow to side of head
- Sew collar around neck area
- Embroider face: Eyes: Use black thread for simple curved lines or dots, Mouth: Small pink curved line, Cheeks: Light pink if desired
- Attach flowers to leaves and sew to flower pot
- Position flower pot in girl's arms and secure
- Add small bows to shoes
- Finish utensil holder with bow accent
FINISHING TOUCHES
- Hanging loop: Attach a braided cord or chain to the back for hanging
- Stabilizing: Add small weights or cardboard inside utensil holder if needed
- Stiffening: Use fabric stiffener on flower pot and utensil holder if desired for structure
PATTERN NOTES
- Adjust stuffing amount for desired firmness
- Vary yarn weights for different sized finished pieces
- Use safety eyes if making for children under 3
- Block pieces lightly with steam if needed for shaping
This kitchen helper doll represents the perfect intersection of functional craft and skill development, offering immediate practical value while teaching advanced amigurumi techniques that enhance every future project. The satisfaction of creating a piece that genuinely improves your daily life while showcasing your growing expertise creates positive reinforcement that motivates continued learning and experimentation. Take time to personalize this pattern with your own color choices and finishing details - these adaptations will teach you more about design principles than dozens of identical pattern repetitions.
Frequently Asked Questions
- → What yarn weight should I use for the kitchen helper doll?
- Worsted weight (4) cotton yarn works best for this project. Cotton is durable, washable, and holds its shape well. You'll need approximately 200 yards total - about 100 yards for the body in skin tone, 50 yards white for the chef's hat, and smaller amounts for the apron, hair, and details.
- → Can I make this doll without safety eyes?
- Absolutely! You can embroider the eyes using black embroidery floss or yarn for a completely child-safe option. Create simple dots, sleepy crescents, or even closed eyes for different expressions. This also allows you to customize the eye shape and style to match your vision.
- → Is this pattern suitable for beginners?
- Yes! This pattern is perfect for beginners who know basic amigurumi stitches - single crochet, increases (2 sc in one stitch), and decreases (sc2tog). The construction is straightforward with clear stitch counts for each round. If you've made a simple amigurumi ball or basic animal, you're ready for this project.
- → How do I make the chef's hat look puffy and realistic?
- The hat's puffy appearance comes from strategic increases and a gathered top. Work the increases evenly to create the dome shape, then gather the top opening and cinch it closed. Stuff the hat lightly before attaching to maintain its shape. The pattern includes a helpful tip about using a hair elastic inside the brim for extra structure.
- → Can I customize the apron design?
- Definitely! The basic apron pattern can be modified in countless ways. Change colors, add stripes, create tiny pockets, or even crochet small kitchen utensils to tuck into the apron strings. You can also adjust the length or add decorative edging using shell stitches or picots.
- → What's the best way to attach the hair?
- The pattern includes two hair methods: looped fringe for curly hair or straight strands for smooth styles. Mark the hairline first, then attach strands using a tapestry needle. For curly hair, cut loops after attaching and brush gently. For pigtails or braids, attach longer strands and style as desired. Secure all hair ends by weaving them through the head's stitches.