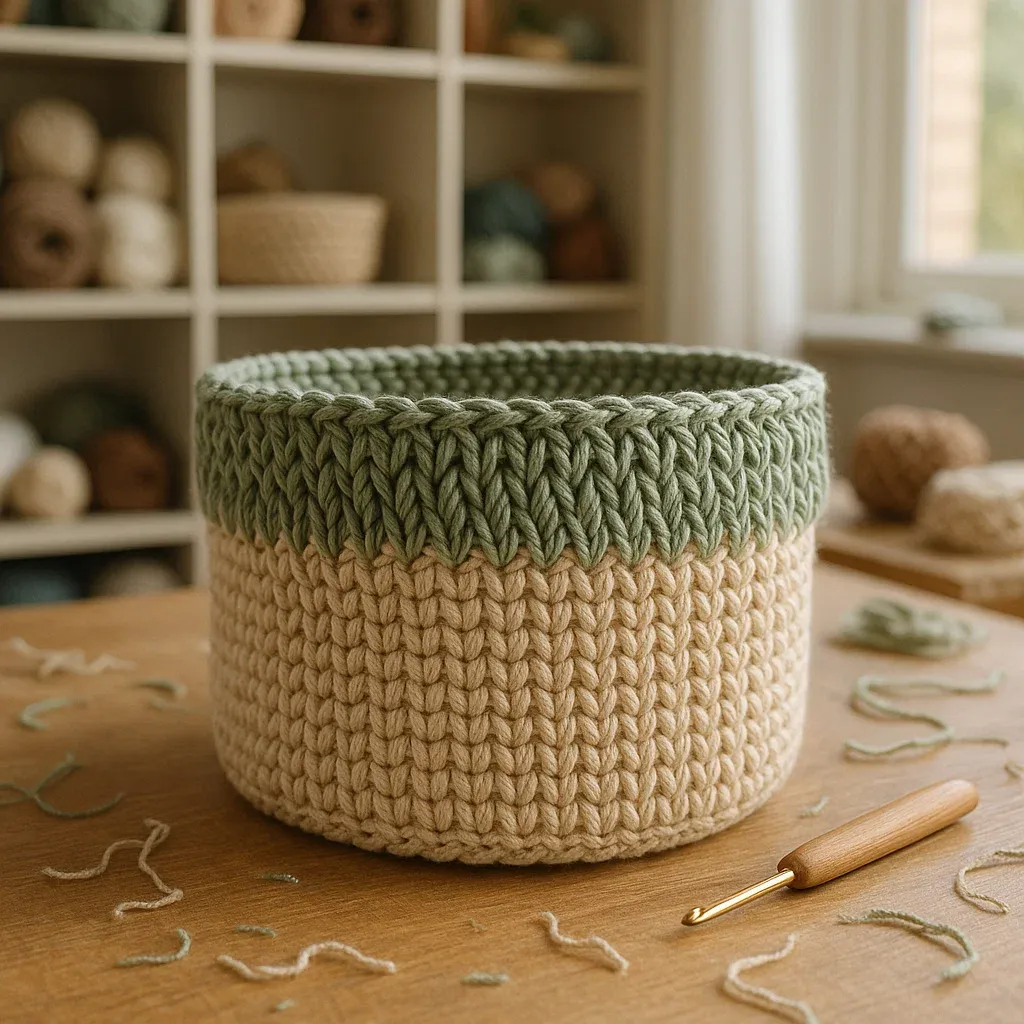
 Pin It
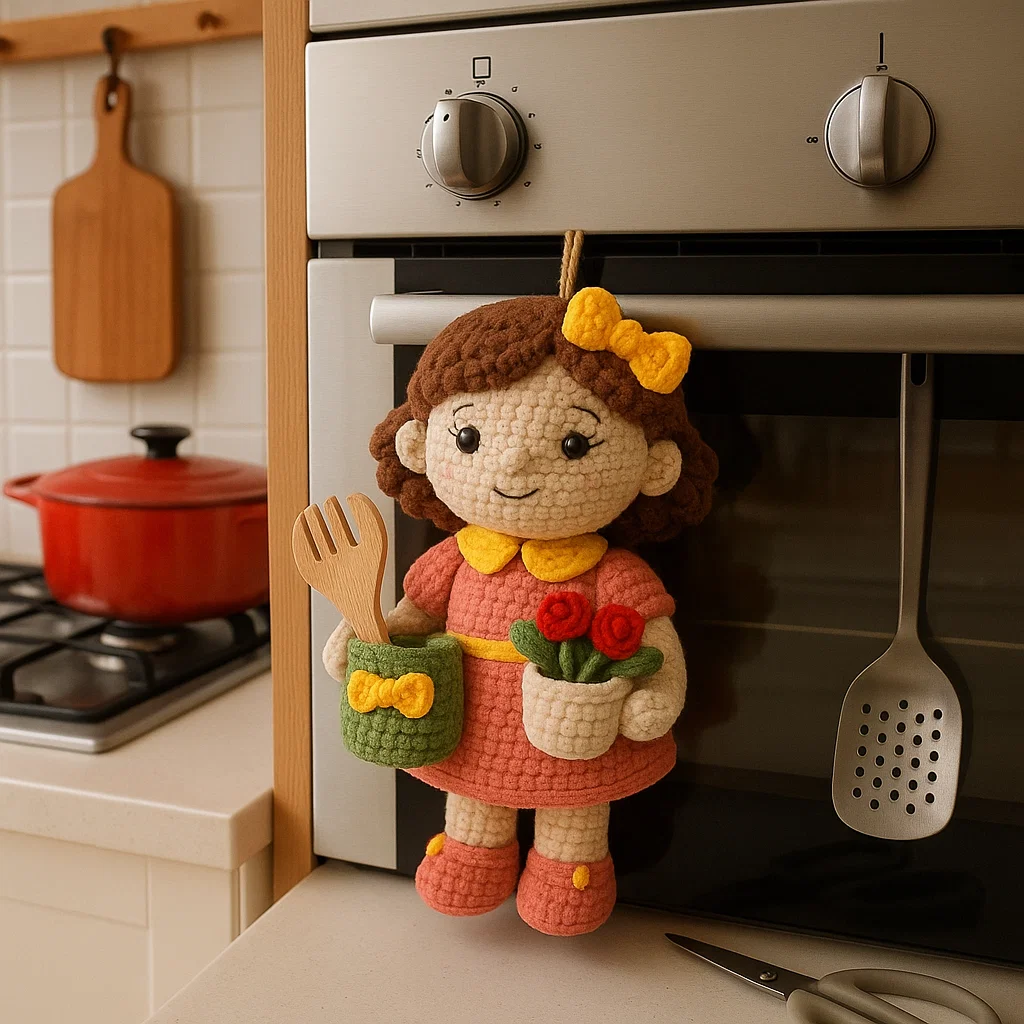
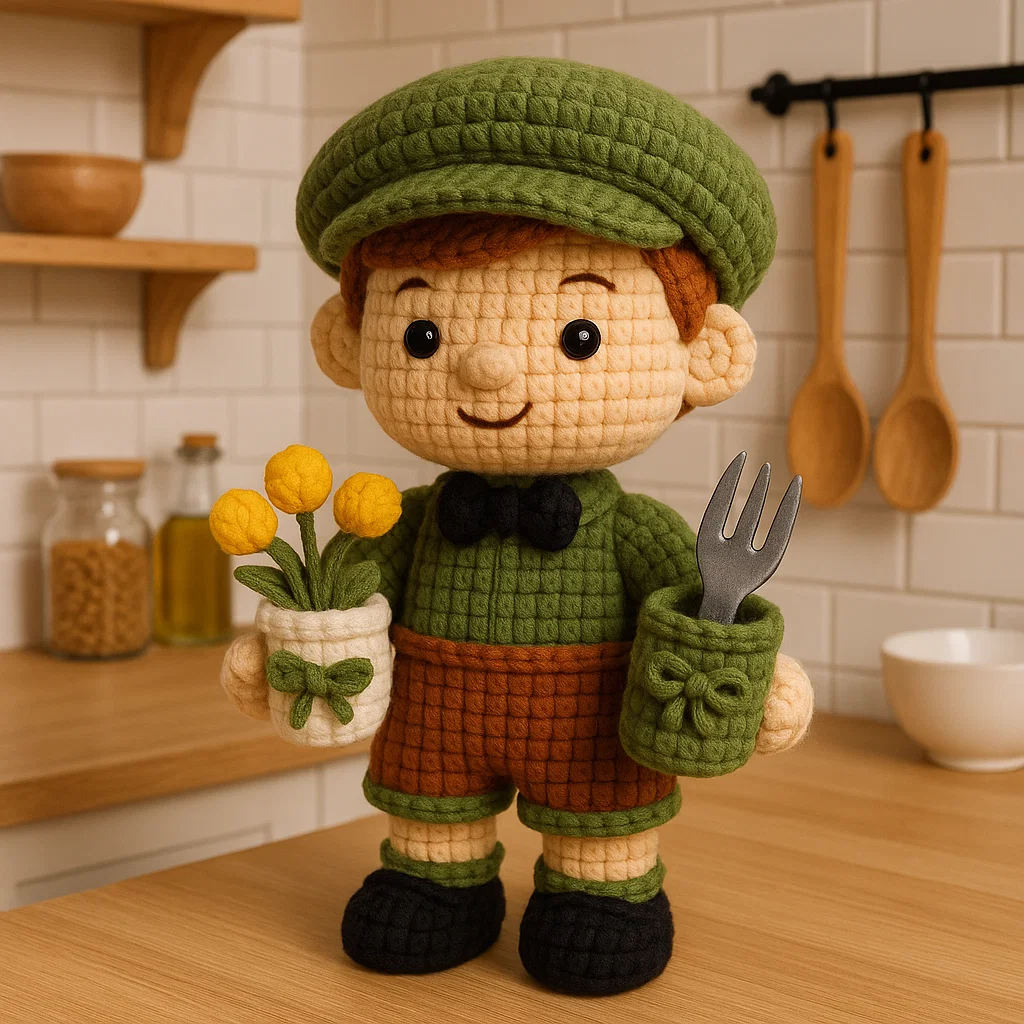
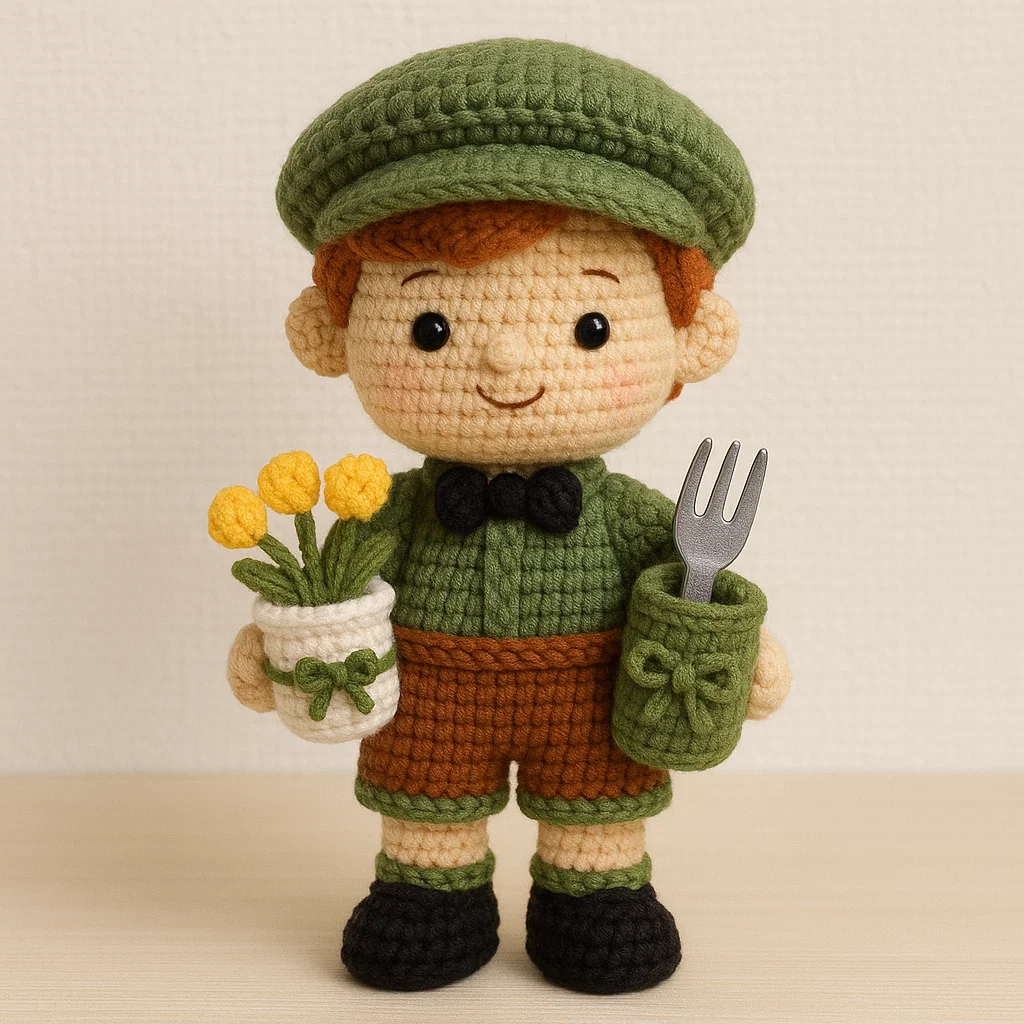
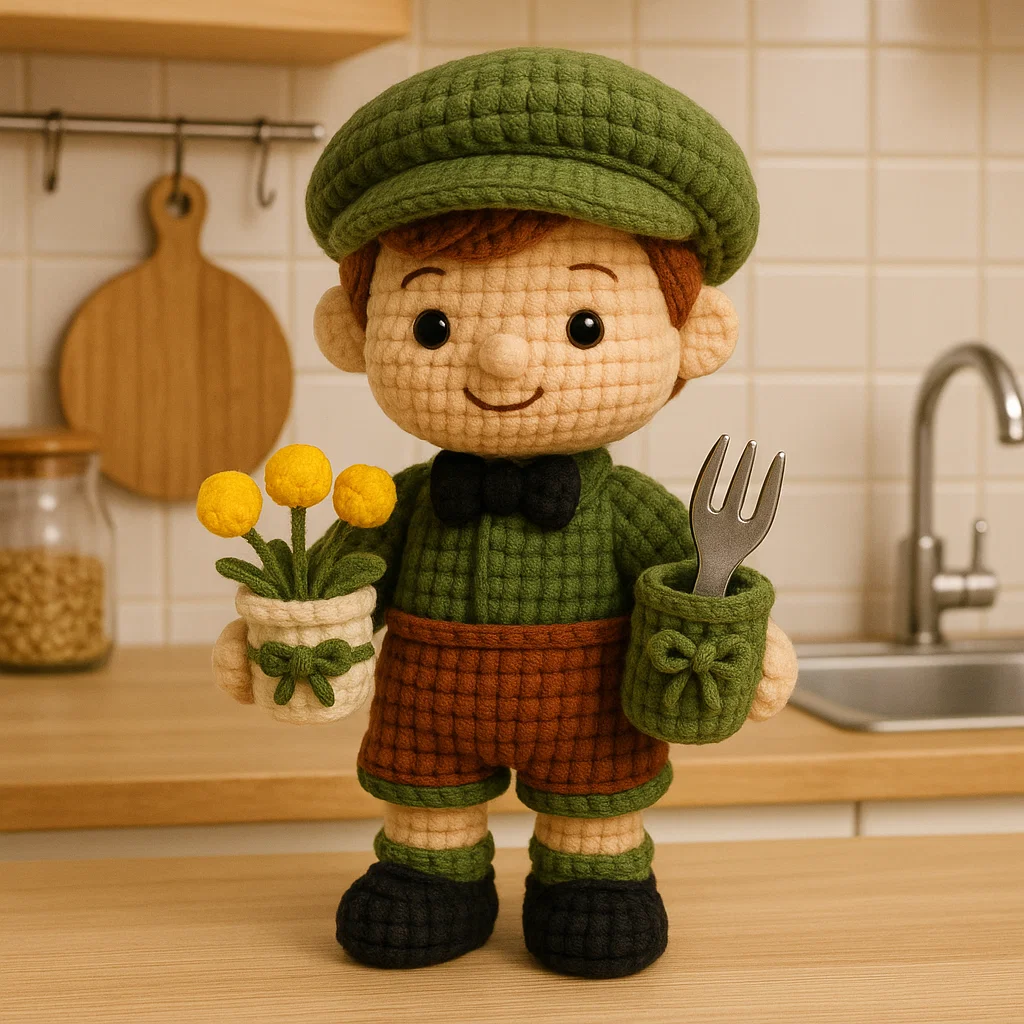
Create an absolutely charming kitchen companion with this detailed crochet kitchen boy pattern that showcases advanced amigurumi techniques while producing a functional storage solution. This intermediate-level project combines sophisticated construction methods including dimensional cap shaping, clothing integration, and structured accessories to create a dapper little gentleman perfect for organizing cooking utensils. The newsboy cap construction alone teaches valuable shaping techniques that translate to countless other projects requiring three-dimensional elements.
Working through this comprehensive pattern builds essential skills in proportion management, complex assembly, and professional finishing that elevate your amigurumi expertise significantly. Each component introduces specific technical challenges from the curved visor construction to the integrated shorts and shirt combination, creating learning opportunities that compound into advanced crochet capabilities. The modular design allows for extensive customization while maintaining structural integrity and professional appearance.
This kitchen boy pairs beautifully with the companion kitchen girl pattern, creating a complete organizational system that brings personality and charm to any cooking space. Whether displayed as decorative elements or used for their intended storage functions, these pieces demonstrate how handmade items can seamlessly blend beauty with utility. The satisfaction of completing such a detailed project while mastering new techniques creates momentum for tackling even more ambitious amigurumi adventures.
I've watched countless students tackle this pattern as their first truly challenging amigurumi project, and the transformation in their confidence and technical ability is remarkable. The moment they successfully shape that newsboy cap and see it fitting perfectly on their little boy's head, something clicks about dimensional construction that opens doors to unlimited creative possibilities. Many return months later with photos of entire amigurumi wardrobes they've designed using principles mastered in this single pattern.
Materials & Tools You'll Need
- Yarn: Worsted weight acrylic or cotton blend in coordinated masculine colors - Requires approximately 350-450 yards total across all colors. Choose warm beige for skin tone, rich orange or rust for hair, classic green for shirt and cap, warm brown for shorts, crisp black for shoes and bow tie, cheerful yellow for flowers, and clean white for the pot. Acrylic provides excellent shape retention for structured elements, while cotton offers superior stitch definition for detailed work.
- Crochet Hook: Size E/4 (3.5mm) or G/6 (4.0mm) - The E hook creates optimal tension for most intermediate crocheters, producing tight, professional fabric that prevents stuffing show-through. Size G accommodates those who naturally crochet tightly or prefer slightly looser fabric for easier stitch insertion during assembly phases.
- High-Quality Polyester Fiberfill Stuffing - Choose premium stuffing that maintains loft and doesn't compress permanently, as this piece will likely see regular handling. Cheap stuffing creates lumpy textures and loses shape quickly, compromising the professional appearance you've worked hard to achieve.
- Sharp Tapestry Needle: Size 16 or 18 with large eye - Essential for invisible seaming and secure component attachment. A bent-tip needle can make navigation easier when working in tight spaces during the detailed assembly process.
- Black Embroidery Thread: Six-strand cotton floss - Provides crisp, defined facial features that won't blur or fade over time. Choose quality thread that separates cleanly for different line weights and maintains consistent color saturation.
- Stitch Markers: Removable type for round tracking - Particularly crucial when working the complex cap construction and multiple similar components like arms and legs. Different colored markers help distinguish between different pattern sections.
- Small Sharp Scissors: For precise yarn cutting - Clean cuts prevent fraying and create professional-looking finished work, especially important when working with multiple color changes and detailed assembly work.
- Optional: Lightweight Interfacing for Cap Visor - Adds structure and professional appearance to the cap visor, creating the realistic shape that distinguishes this project from amateur attempts.
Step-by-Step Instructions
- Master the Head Construction Foundation:
- Begin with the standard amigurumi sphere technique, working from magic ring through the complete head shaping sequence. The key to professional results lies in maintaining absolutely consistent tension throughout all increase rounds - any irregularities in the foundation multiply as you work outward, creating permanent shape distortions that cannot be corrected later. Count stitches obsessively and use stitch markers religiously to prevent the small errors that compound into major problems.
- Create Dimensional Ear Elements:
- The separately constructed ears add realistic detail that distinguishes this pattern from simpler doll designs. Work each ear carefully, maintaining the subtle cupping shape that mimics natural ear formation. Attach positioning is crucial - ears should align with the eye line and angle slightly backward for natural appearance rather than sticking straight out from the head.
- Execute Advanced Newsboy Cap Construction:
- This component represents the most technically challenging aspect of the pattern, requiring understanding of 3D shaping principles and precise stitch placement. Begin with the crown using standard increase techniques, then transition to the brim expansion that creates the characteristic newsboy silhouette. The visor construction demands particular attention to tension and shaping - too loose creates a floppy, unprofessional appearance, while too tight restricts the natural curve essential for realistic headwear.
- Integrate Clothing Elements Seamlessly:
- Unlike patterns with separate clothing pieces, this design incorporates garments directly into the body construction for professional results. The shirt portion follows body shaping principles while the shorts section requires careful division for individual leg openings. This integration technique prevents the bulky, layered appearance common in amateur doll construction while maintaining proper proportions.
- Construct Sophisticated Leg and Foot Elements:
- The combination of legs, socks, and shoes requires careful attention to proportion and assembly sequence. Each element must fit properly with the others while maintaining individual character. The sock construction over the leg base creates realistic layering, while the shoe shaping provides stable foundation for standing display.
- Master Small Detail Construction:
- Elements like the bow tie, flower components, and decorative bows test precision and attention to detail. These small pieces significantly impact the overall professional appearance, so invest time in making them crisp and well-proportioned. The flower pot construction follows principles learned in the main body sections but on a smaller scale, reinforcing technique mastery.
- Execute Professional Assembly Techniques:
- Proper component integration transforms individual pieces into a cohesive, professional-looking finished work. Pay attention to positioning angles, seam placement, and overall posture. The goal is creating a figure that appears naturally posed rather than obviously assembled from separate components.
 Pin It
I consistently recommend this pattern for students ready to advance beyond basic amigurumi because it introduces so many essential intermediate techniques in one cohesive project. My own kitchen boy has been organizing my wooden spoons and whisks for two years, and visitors always comment on the professional quality and attention to detail. The newsboy cap technique has become my go-to method for any character requiring headwear, from baseball caps to winter hats.
Troubleshooting Complex Construction Challenges
Newsboy cap shaping presents unique challenges that require understanding beyond basic amigurumi principles. The crown must maintain proper curvature while the brim expands proportionally, and the visor needs structure without becoming rigid. If your cap appears too small, the crown increases may be insufficient; if it looks floppy, the fabric tension needs tightening. Test fit the cap frequently during construction rather than waiting until completion to discover sizing problems.
Integrated clothing construction can confuse crocheters accustomed to separate garment pieces. The key lies in visualizing how body and clothing shapes merge naturally. The shirt portion should flow smoothly from the body increases without obvious transition lines, while the shorts section must accommodate leg insertion without creating bulk or distortion. Mark your transition points clearly and count stitches carefully to maintain symmetry.
Multiple component assembly requires strategic planning to avoid creating inaccessible areas during construction. Attach the head to body first, establishing basic proportions before adding limbs. Position arms and legs while the torso remains fully accessible, then add clothing elements and accessories in logical sequence. Save the most delicate details like facial features and small bows for final finishing phases when all major construction is complete.
Advanced Shaping and Proportion Techniques
Professional amigurumi construction relies heavily on understanding how increases and decreases affect final shaping. The newsboy cap crown follows standard sphere principles, but the brim expansion requires strategic increase placement to maintain the characteristic flat profile. Study how each increase round affects the overall shape, and don't hesitate to adjust stitch counts if your proportions don't match the intended design.
Clothing integration demands understanding of how fabric drapes and fits around three-dimensional forms. The shirt portion should suggest natural fabric fall while maintaining the structured support necessary for amigurumi construction. The shorts must accommodate the character's proportions while creating realistic clothing silhouettes that enhance rather than hide the underlying form.
Color Coordination and Design Harmony
Successful multi-colored amigurumi projects require careful attention to color relationships and visual balance. This kitchen boy pattern uses a sophisticated masculine palette that coordinates beautifully while maintaining distinct visual interest. The green elements create unity throughout the design, while the brown and black accents provide grounding and definition. Consider how your color choices affect the overall personality and appeal of your finished piece.
Yarn selection affects both appearance and construction success. Different yarn brands and fiber contents can have varying tensions and textures, requiring minor technique adjustments to maintain consistent results. Test each color with practice swatches before beginning your project, and don't hesitate to adjust hook sizes if necessary to maintain uniform fabric density across all components.
 Pin It
Professional Finishing and Presentation
The difference between obviously handmade and professionally crafted amigurumi often lies in finishing details and presentation choices. Steam blocking helps settle stitches and enhance shape definition, particularly important for structured elements like the newsboy cap and formal clothing pieces. Pin components to proper shapes while damp, allowing complete drying before removing blocking materials.
Facial feature placement dramatically affects personality and appeal. Study photographs of children's faces to understand proper proportional relationships between eyes, nose, and mouth. Mark proposed feature locations with pins before committing to permanent embroidery, and step back frequently to assess overall balance and expression. Small adjustments in feature placement can transform the entire character of your finished piece.
Creative Customization and Personal Expression
This pattern provides an excellent foundation for personal creativity and adaptation. Experiment with different hair colors and textures to create characters representing different ethnicities or family members. The clothing color scheme adapts beautifully to different themes - imagine autumn versions in warm oranges and browns, or holiday editions in festive reds and greens.
Consider creating complementary accessories that enhance the kitchen theme while showcasing additional techniques. Miniature aprons, chef's hats, or tool sets provide opportunities to practice new skills while personalizing your creation. These additions also create gift-giving opportunities for different occasions throughout the year.
Skill Building Through Progressive Complexity
This kitchen boy pattern serves as an excellent bridge between basic amigurumi and advanced doll making, introducing complex concepts in manageable increments. The newsboy cap construction alone teaches principles applicable to countless other projects requiring three-dimensional shaping and realistic proportions. Document your learning process and any modifications you discover - these notes become invaluable references for future advanced projects.
Use this project to experiment with different construction sequences and finishing techniques. Try various approaches to component assembly, facial feature styles, and detail placement to discover your preferred methods. These experiments help develop the personal artistic voice that distinguishes your work from simple pattern reproductions and moves you toward original design capabilities.
Building Your Advanced Amigurumi Library
Master this construction method, and you've unlocked the ability to create sophisticated character variations for countless themes and purposes. Bedroom helpers might wear pajamas and hold books, while garden versions could sport overalls and carry seed packets. Holiday characters work beautifully for seasonal displays, while professional variations create thoughtful gifts for specific careers or hobbies.
Experiment with scale variations to create character families or different functional sizes. Smaller versions make perfect ornaments or gift toppers, while larger versions can handle more substantial storage needs. The proportional relationships established in this pattern scale successfully in either direction with appropriate yarn and hook size adjustments.
Complete Kitchen Boy with Newsboy Cap Pattern
Skill Level: Intermediate
Finished Size: Approximately 8-10 inches tall
Yarn Weight: Worsted Weight (4)
Materials List:
Beige/Cream: 100 yards (skin tone)
Orange/Rust: 40 yards (hair)
Green: 120 yards (shirt, cap, socks, utensil holder)
Brown/Tan: 80 yards (shorts, shoes)
Black: 50 yards (bow tie, shoes)
Yellow: 30 yards (flowers)
White: 40 yards (flower pot)
Hook: 3.5mm (E/4) or 4mm (G/6)
Stuffing: Polyester fiberfill
Notions: Yarn needle, stitch markers, black embroidery thread
Pattern Abbreviations:
ch = chain
sc = single crochet
inc = increase (2 sc in one stitch)
dec = decrease (sc2tog)
sl st = slip stitch
dc = double crochet
hdc = half double crochet
st(s) = stitch(es)
rnd = round
BLO = back loops only
FLO = front loops only
HEAD (Beige)
Rnd 1: Magic ring, 6 sc (6)
Rnd 2: Inc in each st around (12)
Rnd 3: *Sc 1, inc; rep from * around (18)
Rnd 4: *Sc 2, inc; rep from * around (24)
Rnd 5: *Sc 3, inc; rep from * around (30)
Rnd 6: *Sc 4, inc; rep from * around (36)
Rnds 7-13: Sc around (36) - 7 rounds
Rnd 14: *Sc 4, dec; rep from * around (30)
Rnd 15: *Sc 3, dec; rep from * around (24)
Rnd 16: *Sc 2, dec; rep from * around (18)
Stuff firmly
Rnd 17: *Sc 1, dec; rep from * around (12)
Rnd 18: Dec around (6)
Fasten off, close opening
EARS (Beige) - Make 2
Rnd 1: Magic ring, 6 sc (6)
Rnd 2: *Sc 1, inc; rep from * around (9)
Rnd 3: Sc around (9)
Fasten off, don't stuff
HAIR (Orange/Rust)
Create small tufts of hair that peek out from under the cap:
Small hair pieces (make 6-8):
Ch 4, sc in 2nd ch from hook, sc 2
Fasten off
Sew around hairline under cap
NEWSBOY CAP (Green)
Crown:
Rnd 1: Magic ring, 6 sc (6)
Rnd 2: Inc in each st around (12)
Rnd 3: *Sc 1, inc; rep from * around (18)
Rnd 4: *Sc 2, inc; rep from * around (24)
Rnd 5: *Sc 3, inc; rep from * around (30)
Rnd 6: *Sc 4, inc; rep from * around (36)
Rnds 7-10: Sc around (36) - 4 rounds
Brim:
Rnd 11: *Sc 8, inc; rep from * around (40)
Rnd 12: Sc around (40)
Rnd 13: *Sc 9, inc; rep from * around (44)
Visor:
Working on 16 sts in front:
Row 1: Sc 16, turn
Row 2: Dec, sc 12, dec, turn (14)
Row 3: Dec, sc 10, dec, turn (12)
Row 4: Dec, sc 8, dec, turn (10)
Row 5: Sc 10
Fasten off
BODY/SHIRT (Green)
Rnd 1: Magic ring, 6 sc (6)
Rnd 2: Inc in each st around (12)
Rnd 3: *Sc 1, inc; rep from * around (18)
Rnd 4: *Sc 2, inc; rep from * around (24)
Rnd 5: *Sc 3, inc; rep from * around (30)
Rnds 6-12: Sc around (30) - 7 rounds
Rnd 13: *Sc 3, dec; rep from * around (24)
Rnds 14-15: Sc around (24)
Stuff firmly
Rnd 16: *Sc 2, dec; rep from * around (18)
Rnd 17: *Sc 1, dec; rep from * around (12)
Fasten off, leave long tail for sewing
ARMS (Beige) - Make 2
Rnd 1: Magic ring, 6 sc (6)
Rnd 2: *Sc 1, inc; rep from * around (9)
Rnds 3-4: Sc around (9)
Change to green for sleeves:
Rnds 5-12: Sc around (9) - 8 rounds
Stuff lightly, fasten off
LEGS (Beige) - Make 2
Rnd 1: Magic ring, 6 sc (6)
Rnd 2: Inc in each st around (12)
Rnds 3-4: Sc around (12)
Rnd 5: *Sc 4, dec; rep from * around (10)
Rnds 6-10: Sc around (10) - 5 rounds
Stuff lightly, fasten off
SHORTS (Brown/Tan)
Rnd 1: Magic ring, 6 sc (6)
Rnd 2: Inc in each st around (12)
Rnd 3: *Sc 1, inc; rep from * around (18)
Rnd 4: *Sc 2, inc; rep from * around (24)
Rnd 5: *Sc 3, inc; rep from * around (30)
Rnds 6-8: Sc around (30) - 3 rounds
Leg openings:
Divide for two legs (15 sts each)
Rnds 9-11: Sc around each leg opening (15) - 3 rounds
Add green trim at bottom of each leg
SOCKS (Green) - Make 2
Rnd 1: Magic ring, 6 sc (6)
Rnd 2: Inc in each st around (12)
Rnd 3: *Sc 1, inc; rep from * around (18)
Rnd 4: Sc in BLO (18)
Rnds 5-7: Sc around (18) - 3 rounds
Fasten off
SHOES (Black) - Make 2
Rnd 1: Magic ring, 6 sc (6)
Rnd 2: Inc in each st around (12)
Rnd 3: *Sc 1, inc; rep from * around (18)
Rnd 4: *Sc 2, inc; rep from * around (24)
Rnd 5: Sc in BLO (24)
Rnds 6-7: Sc around (24)
Rnd 8: Sc 8, dec 4 times, sc 8 (20)
Rnd 9: Sc 8, dec 2 times, sc 8 (18)
Rnd 10: Sc around (18)
Fasten off
BOW TIE (Black)
Main part:
Ch 10
Rows 1-3: Sc across, ch 1, turn
Fasten off
Center:
Ch 4, work 4 rows of sc
Wrap around center of bow tie rectangle
FLOWER POT (White)
Bottom:
Rnd 1: Magic ring, 6 sc (6)
Rnd 2: Inc in each st around (12)
Rnd 3: *Sc 1, inc; rep from * around (18)
Sides:
Rnd 4: Sc in BLO (18)
Rnds 5-8: Sc around (18) - 4 rounds
Green bow for pot:
Small version of bow tie in green
FLOWERS (Yellow) - Make 3
Rnd 1: Magic ring, ch 2, 10 dc in ring, sl st to first dc
Rnd 2: *Ch 3, sc in next st; rep from * around
Work in petal formation for tulip shape
Fasten off
STEMS AND LEAVES (Green)
Stems: Chain 8-10 for each flower
Leaves:
Ch 6, sc in 2nd ch from hook, hdc, dc, hdc, sc
Work back along other side
Make 4-6 leaves total
UTENSIL HOLDER (Green)
Bottom:
Rnd 1: Magic ring, 6 sc (6)
Rnd 2: Inc in each st around (12)
Rnd 3: *Sc 1, inc; rep from * around (18)
Rnd 4: *Sc 2, inc; rep from * around (24)
Sides:
Rnd 5: Sc in BLO (24)
Rnds 6-12: Sc around (24) - 7 rounds
Green bow for holder:
Same as flower pot bow
ASSEMBLY INSTRUCTIONS
- Attach head to body using long tail
- Sew ears to sides of head
- Add hair tufts around hairline
- Fit newsboy cap on head and secure
- Attach arms to body at shoulder level
- Put on shorts and sew to body
- Insert legs into shorts leg openings
- Add socks over legs
- Put on shoes and secure
- Attach bow tie to neck area
- Embroider face: Eyes: Black embroidery thread - simple dots or small circles, Eyebrows: Light brown curved lines, Mouth: Small pink curved smile
- Assemble flowers with stems and leaves
- Attach flowers to pot with green bow
- Position flower pot in boy's arms
- Add bow to utensil holder
SPECIAL DETAILS
- Textured Stitching: Use front post and back post double crochet on the shirt and cap for added texture
- Cap Structure: Add interfacing or cardboard to visor for stiffness
- Hanging Loop: Attach braided green cord to back of cap or shirt
FINISHING TOUCHES
- Facial Expression: Embroider a gentle, friendly smile
- Cap Fit: Ensure cap sits properly with hair peeking out
- Color Coordination: All green elements should match for cohesion
- Stability: Weight bottom of utensil holder if needed
PATTERN NOTES
- This boy pairs perfectly with the kitchen girl pattern
- Adjust proportions to match if making as a set
- Use stitch markers to keep track of rounds
- Steam block lightly for professional finish
This kitchen boy with newsboy cap represents the perfect advancement project for intermediate crocheters ready to tackle sophisticated amigurumi construction while creating genuinely functional home accessories. The combination of advanced techniques, practical utility, and charming personality creates a project that rewards both the making process and years of daily use. Take time to master each component thoroughly before moving to assembly - the extra attention to detail will result in a finished piece that rivals commercial decorative items while showcasing your growing expertise.
Frequently Asked Questions
- → How do I create the distinctive shape of the newsboy cap?
- The newsboy cap is worked in sections - first the crown using strategic increases, then the distinctive peaked brim worked separately and attached. The key is the gathered crown technique where you create extra fabric, then cinch it into the band. The pattern includes detailed diagrams showing how to shape the peak and attach it at the correct angle for that authentic newsboy look.
- → What's the best yarn choice for achieving the vintage look?
- For authentic vintage appeal, choose muted, earthy colors in worsted weight cotton. Try cream or beige for skin, warm brown for hair, deep navy or charcoal for the cap, and classic white or cream for the apron. Avoid bright, modern colors. Cotton yarn also gives the structured look needed for the cap and apron details.
- → How do I make the suspenders look realistic?
- The suspenders are created using a combination of surface crochet and sewn strips. Work thin strips in contrasting color (usually dark brown or black), then attach them in an X-pattern across the back and straight down the front. The pattern includes templates for proper placement and techniques for creating realistic buckle details using embroidery.
- → Can I adjust the doll's size while keeping the proportions correct?
- Yes! The pattern includes scaling instructions for 7-inch and 11-inch versions. The key is maintaining the head-to-body ratio and adjusting the cap size accordingly. Smaller versions work well as ornaments, while larger ones make impressive display pieces. Remember to adjust your hook size and yarn weight proportionally.
- → What skill level is needed for this pattern?
- This is an intermediate beginner pattern. You should be comfortable with basic amigurumi (single crochet, increases, decreases) and working in continuous rounds. The newsboy cap construction requires some patience and attention to shaping, but the pattern includes plenty of photos and tips to guide you through the trickier sections.
- → How do I achieve the 'flour-dusted' effect on the apron?
- The flour-dusted look is created using a dry brush technique with white acrylic paint or fabric paint. Lightly dab a nearly dry brush with white paint and gently brush over the apron surface. You can also use white chalk pastels for a more subtle effect. Always test on a yarn swatch first and let it dry completely before handling.